Simple makeup should look effortless — not unfinished. The difference between “I did five minutes” and “I planned this look” is small choices, cleaner technique, and a focus on placement and texture. This guide breaks down every step you need to make a pared-back, natural makeup routine look polished, professional, and intentionally designed for your face — with step-by-step actions, tools to use, and quick fixes for common mistakes.
Why simple makeup needs an intentional touch
Minimal makeup can be more powerful than dramatic looks because it highlights your natural features. But minimal doesn’t mean slap-dash. Intentional simple makeup means choosing lightweight products, prioritizing skin and structure, and finishing with details that read purposeful in photos and real life. With five core skills — preparation, subtle sculpting, clean lines, thoughtful color placement, and perfect blending — you’ll always look poised, not rushed.
Start with Flawless Skin: Prep and Prime
Good makeup starts with good skin prep. Even if you’re using a tint or a light B.B. cream, prepping creates a smooth canvas and ensures the product sits beautifully.
Step-by-step skin prep:
- Cleanse with a gentle cleanser suited to your skin type. Dry skin → cream cleanser. Oily/combination → gentle gel.
- Hydrate: while skin is slightly damp, press in a hydrating serum (hyaluronic acid or glycerin). One small pump is enough.
- Moisturize: choose a lightweight moisturizer for the morning. For dry skin, pick a richer cream; for oily skin, a gel or lotion. Apply to face and neck.
- Prime selectively: if your skin gets oily at the T-zone, apply a small amount of mattifying primer there. If you want glow, use a luminous primer only on high points (cheek tops, nose bridge).
- Target problem areas: use a pore-minimizing primer in the nose/cheek area or a smoothing balm over texture only.
Why this matters: priming evens texture, helps foundation adhere, reduces settling into pores, and makes a light base read seamless.
Quick tip: if you’re short on time, a hydrating mist + a tinted moisturizer applied with fingers will still look considered if your skin is prepped.
Perfect Your Base: Lightweight Foundations and Concealers

A natural base should even skin tone while letting texture and personality show through.
Step-by-step base application:
- Choose the right formula: opt for a skin tint, light coverage foundation, or tinted moisturizer for a natural finish. For more coverage, use a sheer-buildable foundation.
- Match in natural light: test shades on the jawline. The right shade disappears into the skin.
- Apply sparingly with your tool of choice: fingers for fastest natural finish, damp sponge for blended skin-like results, or a stippling brush for slightly more coverage. Start in the center of the face and blend outward.
- Conceal selectively: dot concealer only where needed — under the eyes (triangle shape), around the nose, and on blemishes. Pat, don’t rub.
- Sheer and set: if you tend to get oily, lightly dust a finely-milled translucent powder only where you need it (center T-zone, under eyes to set concealer). Use a large fluffy brush and a feather-light touch.
Mini troubleshooting:
- If it looks cakey → you used too much product or dried the skin out before applying. Rehydrate with a facial mist and blend with a damp sponge.
- If it settles into fine lines → use less concealer, tap in, and set with a tiny amount of powder only where necessary.
Intentional finish: keep edges soft — chin/temple/neck transitions should be invisible.
Sculpt Subtly: Soft Contour and Natural-Looking Bronzer
Sculpting brings dimension without heavy lines. Think shadow and warmth, not stripes.
Step-by-step sculpting:
- Choose shades wisely: a contour shade should be a cool/neutral taupe 1–2 shades darker than your skin, bronzer should be warm but not orange.
- Map your face: imagine the “3” on each side of the face — temples, hollows of cheeks, jawline. For lifting, angle contour slightly upward toward temples.
- Apply sparingly: use a small fluffy angled brush. Lightly sweep contour into hollows — build gradually.
- Blend upward: use a clean fluffy brush or sponge to buff edges so there’s no clear line.
- Add bronzer for warmth: sweep bronzer across the forehead at the hairline, the tops of cheeks, and the sides of the nose — lightly.
- Skip harsh powder if you have dry or mature skin; use cream contour or a light matte bronzer and quickly blend with fingers.
Pro tip: if you want a naturally sun-kissed effect, apply bronzer where the sun would naturally hit, not where you’re trying to slim.
Polished Brows: Shape, Fill, and Set
Brows frame everything. Clean, natural brows make even minimal makeup look considered.
Step-by-step brow grooming:
- Brush brows up with a spoolie. Trim any overly long hairs carefully (optional).
- Fill in sparingly: use a pencil for hair-like strokes in sparse areas, or a tinted brow gel for fast, uniform tint. Match eyebrow color to 1 shade darker than hair for definition.
- Define the arch lightly — don’t redraw the whole brow. Focus on sparse areas and the tail.
- Set with clear or tinted brow gel to lock shape. Brush hairs upward and out for a lifted, modern look.
- Clean edges with a small dab of concealer along the lower brow line if you want a super crisp finish — blend downwards so it doesn’t look painted.
Small detail: a slightly fuller brow balances lifted cheeks and softens the face visually.
Eyes That Read Clean: Minimal Shadow, Maximum Definition
Minimal eye makeup should read defined, not blank.
Step-by-step minimalist eyes:
- Prime lightly (or tap a bit of concealer on lids) so shadow sits evenly.
- Use a neutral matte shade one or two shades darker than your skin across the lid and slightly into the crease to create depth. Blend with a fluffy brush for a soft gradient.
- Define the crease subtly with a tiny bit more pigment on the outer V for natural contour—keep it soft.
- Highlight inner corners and brow bone with a very subtle satin or matte champagne to open the eyes. Avoid strong sparkle unless for evening.
- Tightline or use a soft liner at the root line (see next section) rather than heavy liner on top of the lid for a more alive, open look.
Why this works: a little shadow that’s well-blended reads as structure and polish without being obvious makeup.
Eyeliner Tricks That Look Effortless, Not Heavy
The right liner makes lashes look thicker and eyes defined, but the trick is softness.
Step-by-step liner styles:
- Tightline for natural density: use a waterproof pencil to gently line the upper waterline (between lashes) — this makes lashes look fuller without visible liner.
- Soft pencil along lashes: smudge a brown or soft black pencil along the upper lash line and blend immediately with a small smudging brush for a diffused, lived-in look.
- Subtle wing option: for a lifted effect, draw a tiny flick that follows the lower lash line’s angle — keep it thin and slightly upward.
- Avoid heavy lower liner: if you use anything under the eye, make it a short, soft line at the outer third and smudge for softness.
- For hooded eyes: place most of your liner slightly outward and keep the inner lid clean to avoid closing off the eye.
Pencil vs. liquid: pencils are more forgiving and easier to smudge for an intentional natural look; liquids are for sharper, bolder intent.
Lift with Lashes: Curling and Smart Mascara Application
Lashes instantly open and lift the face. The technique matters more than the brand.
Step-by-step lash lift without extensions:
- Start with clean lashes. If mascara is already on, remove and dry.
- Heat the curler slightly with your hairdryer for 1–2 seconds (test on hand) to get a longer-lasting curl.
- Curl in three presses: at the base (hold 5–8 seconds), mid-length, and tips for a natural curve.
- Apply mascara at the base: wiggle the wand side-to-side at the root to deposit pigment on the base, then comb through to tips. Two thin coats are better than one heavy coat.
- Comb or separate with a clean spoolie if clumping occurs, then add a tiny coat of clear mascara on the tips if you want flake protection and separation.
- If you want more lift: apply mascara primarily to the outer lashes to create the illusion of a lifted eye.
Bonus: using a lengthening formula rather than a volumizing one keeps lashes feather-light and natural.
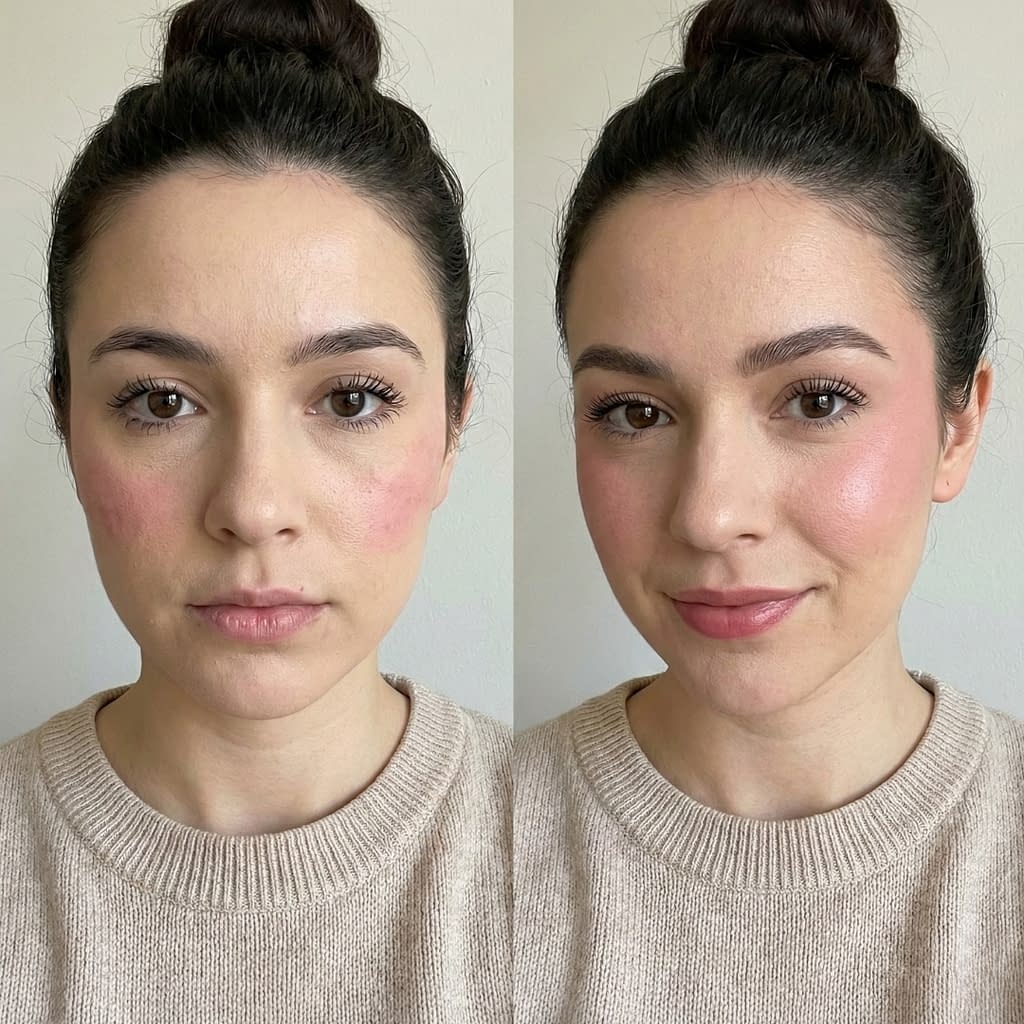
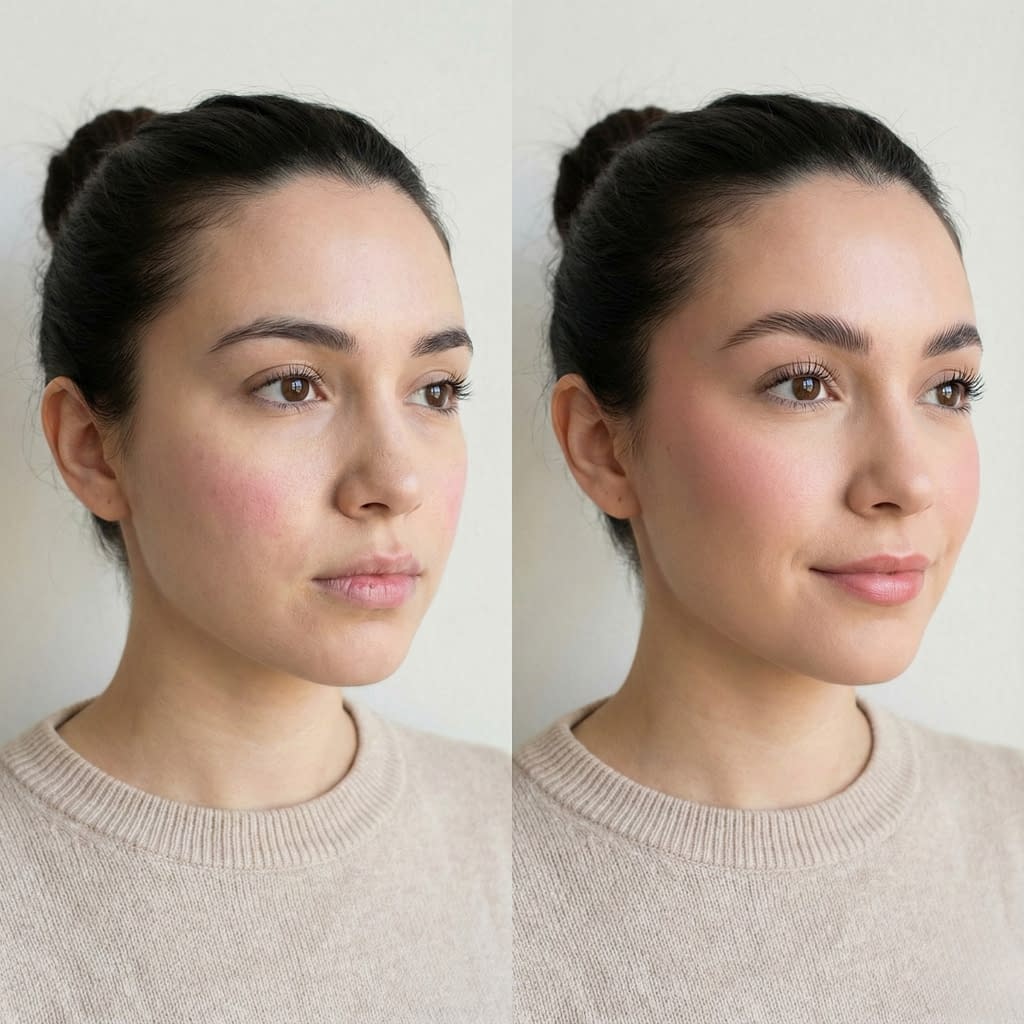
Cheeks That Bloom: Natural Blush Placement

A natural blush placement makes a face look alive and intentional — not flat.
Step-by-step blush application:
- Choose formula: cream blushes blend into skin and look dewy; powders are easier to control for oily skin.
- Find placement: smile to find the apple of the cheek; for a lift, apply slightly higher and sweep toward the temple.
- Build color slowly: start with a small amount and blend with fingers or a dense stippling brush.
- Blend edges so there are no harsh circles — the finish should look like a natural flush.
- Use warmth + blush together: if you’ve contoured and bronzed, blend blush into the top edge of bronzer for a cohesive finish.
Intentional note: blush is the punctuation mark of simple makeup — pick a flattering shade and place it deliberately.
Lips with Purpose: Tints, Balms, and Clean Lines
Lips can be effortless and defined — key is a clean edge and a flattering tint.
Step-by-step lip finishing:
- Prep: exfoliate gently with a sugar scrub if needed and moisturize with a balm. Blot excess before color.
- Choose finish: for simple looks, use a tinted balm or stain. For more presence, pick a satin lipstick.
- Define but don’t overline: use a lip pencil in a close shade to slightly tidy edges, not to dramatically overdraw. Trace natural lip shape and lightly fill in.
- Apply color: dab and press with finger or brush for a soft, diffused look. For more precision, apply with a small lip brush.
- Blot then set lightly with tissue and a tiny dusting of translucent powder at the center to keep stain longer (optional).
- Gloss?: a dab of clear gloss at center of lips adds dimension; avoid all-over glossy stickiness for daytime.
A soft, well-placed lip color reads polished even when everything else is minimal.
Finish Like a Pro: Blending, Setting, and Finishing Sprays
The finishing steps are what make simple makeup look purposeful.
Step-by-step finishing routine:
- Final blend: using a clean, soft brush or sponge, do a final gentle sweep over the face to melt textures together — forehead, nose, chin edges.
- Set strategically: if your skin gets shiny, set the T-zone with a small amount of translucent powder; avoid over-powdering cheeks for a natural finish.
- Add a finishing mist: a light spritz of setting spray from arm’s length (two passes) gives cohesion, reduces powderiness, and makes makeup look like skin.
- Check in natural light: step away and view in daylight if possible — tweak any edges that look too sharp.
The goal: everything should read seamless, soft, and natural from a foot away.
Small Details That Make a Big Difference (Tools, Touch-Ups, Lighting)

Tiny things elevate a simple routine.
Actionable micro-tips:
- Use good tools: inexpensive but soft brushes and a damp sponge make blending easier and more natural.
- Lighting matters: apply makeup near natural light or a daylight lamp to avoid overdoing color.
- Keep tissues and q-tips handy for small cleanups (tiny concealer on a q-tip removes stray liner).
- Press, don’t drag: when blending, pressing motions preserve coverage while melting edges.
- Pack a mini kit: blotting paper, tinted balm, and a tiny powder puff are great for midday refresh.
These finishing rituals are small but keep a simple look from reading rushed.
Quick 5-Minute Routine to Look Intentionally Polished
For busy mornings: a fast routine that looks carefully done.
5-minute step-by-step:
- Prep: mist face and apply a pea-sized tinted moisturizer with fingers (1 min).
- Conceal: dab concealer under eyes and on any spot; blend with finger (30 sec).
- Brows & curl lashes: brush brows and fill gaps quickly; curl lashes (40 sec).
- Mascara + blush: one coat of mascara and cream blush dabbed on apples and blended toward temples (1 min).
- Lips + set: balm or tint on lips, quick spritz of setting spray (30 sec).
- Final check: groom edges and toss on a polished earring or scarf to look put-together (20 sec).
Minimal time, maximal intentionality.
Final Words
Simple makeup looks truly intentional when you focus on skin prep, subtle shape, clean lines, and tiny finishing details. The trick is to choose a few high-impact moves (skin priming, subtle contour, groomed brows, lifted lashes, and carefully placed color) and execute them with lightness and blended edges. Practice the five-minute routine until it’s second nature, then add one detail at a time as you want. Consistency and control over placement are what read polished — not heavy product. Wear your face, not your makeup.


