You don’t need a full makeup haul to look more polished — small technique tweaks, smarter layering, and better use of what’s already in your kit will lift your whole look. This post walks through practical, step-by-step ways to make your current makeup perform like new: from skin prep and blending, to creative multi-use hacks, lighting awareness, and easy placement tricks that add definition and lift. Pick a few tips, practise them for a week, and you’ll be amazed what subtle changes can do.
Why You Don’t Need More Products to Improve Your Makeup
Buying new products can feel fun, but the fastest, cheapest upgrades come from skill, not stuff. Most people underuse the items they already have or apply them in ways that reveal texture, look heavy, or don’t flatter their face shape. Improving the base, using less product, and changing application methods often gives better results than a new palette.
Quick mindset shift (do this first)
- Take a 2-minute inventory of your kit: one foundation, one concealer, a neutral shadow, a blush/bronzer, mascara, and a brow tool.
- Promise not to buy anything for 7 days — spend that time practising the techniques below.
- Remember: technique + good lighting = instant upgrade.
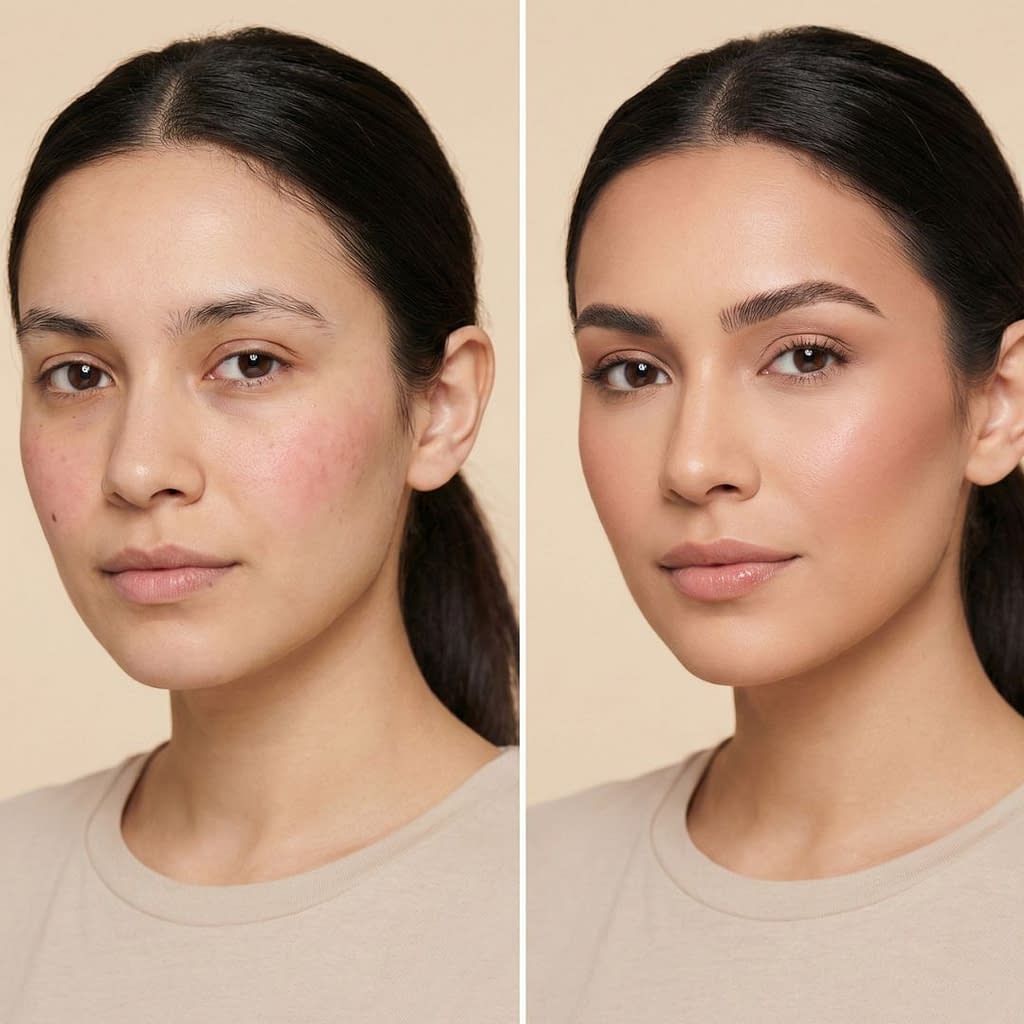
Start With Better Skin Prep for Instant Results
Good makeup sits on good skin. Prepping hydrates the skin, smooths texture, and helps products blend and last.
Step-by-step skin-prep routine (3–5 minutes)
- Cleanse lightly to remove oil and sweat. Use lukewarm water.
- Hydrate with a few drops of hyaluronic or a light serum on damp skin to lock in moisture.
- Moisturize with a lightweight moisturizer if your skin is normal/combination, or a richer one if you’re dry. Allow ~30–60 seconds to absorb.
- Prime where needed: use a smoothing silicone primer on areas with texture (nose, cheeks) or a hydrating primer on dry zones. You only need a pea-sized amount.
- Blot any excess oil before makeup starts — a light press with a tissue keeps the base from sliding.
Why it helps: hydrated skin reduces flakiness and avoids the “foundation sitting in lines” look.
Master Blending: The Skill That Changes Everything
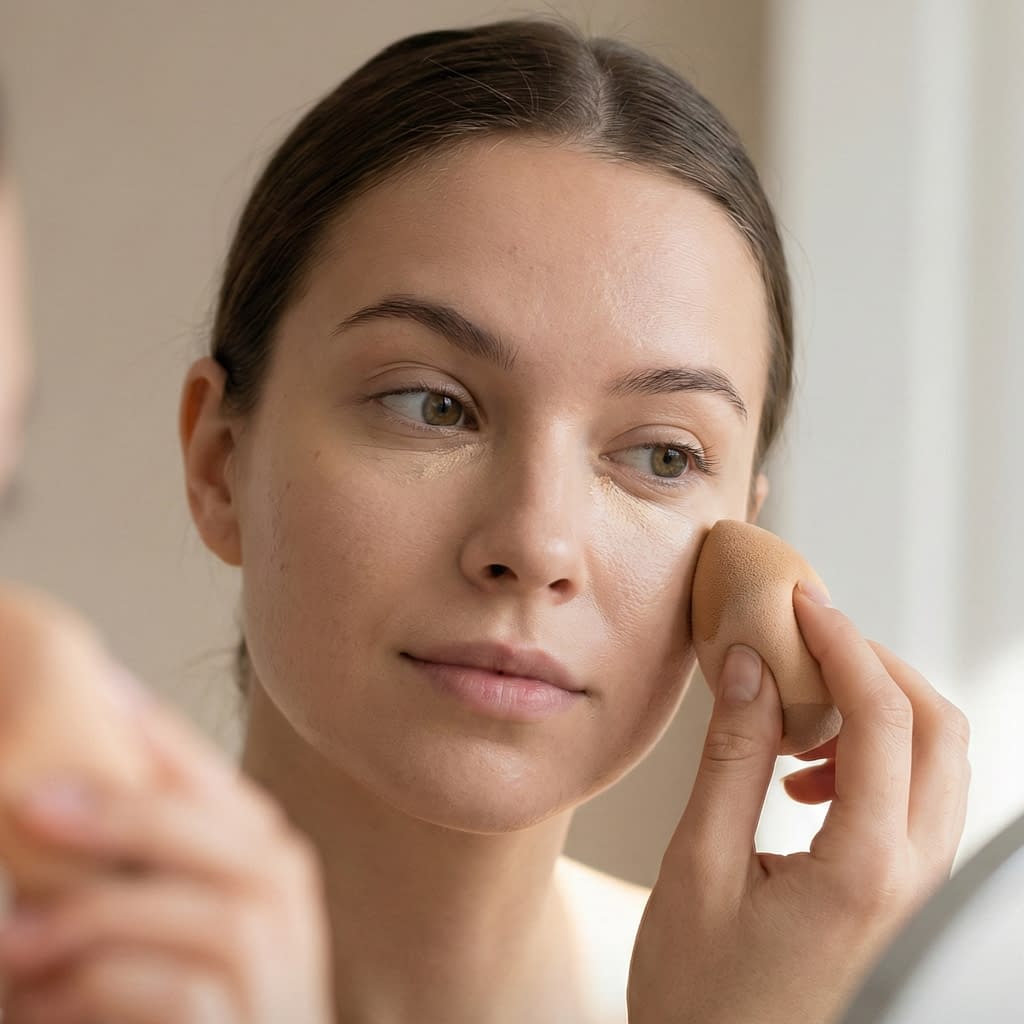
Blending is not rubbing — it’s pressing, patting, and softening edges so product melts into skin.
Blending basics (step-by-step)
- Tools matter: use a damp makeup sponge for a skin-like finish; a dense buffing brush gives a polished look. Clean tools weekly.
- Less is more: tap product onto the face in thin layers. Never pile on.
- Press, don’t drag: press foundation and concealer into the skin with a sponge; buff powders with light circular motions.
- Feather edges: where two shades meet (concealer to foundation, contour to base), work in *soft* tiny motions to blur lines until you can’t see the border.
- Step back & check in natural light after each layer — fix while you can.
Practice tip: spend five minutes doing only blending — no new product — until you feel the difference.
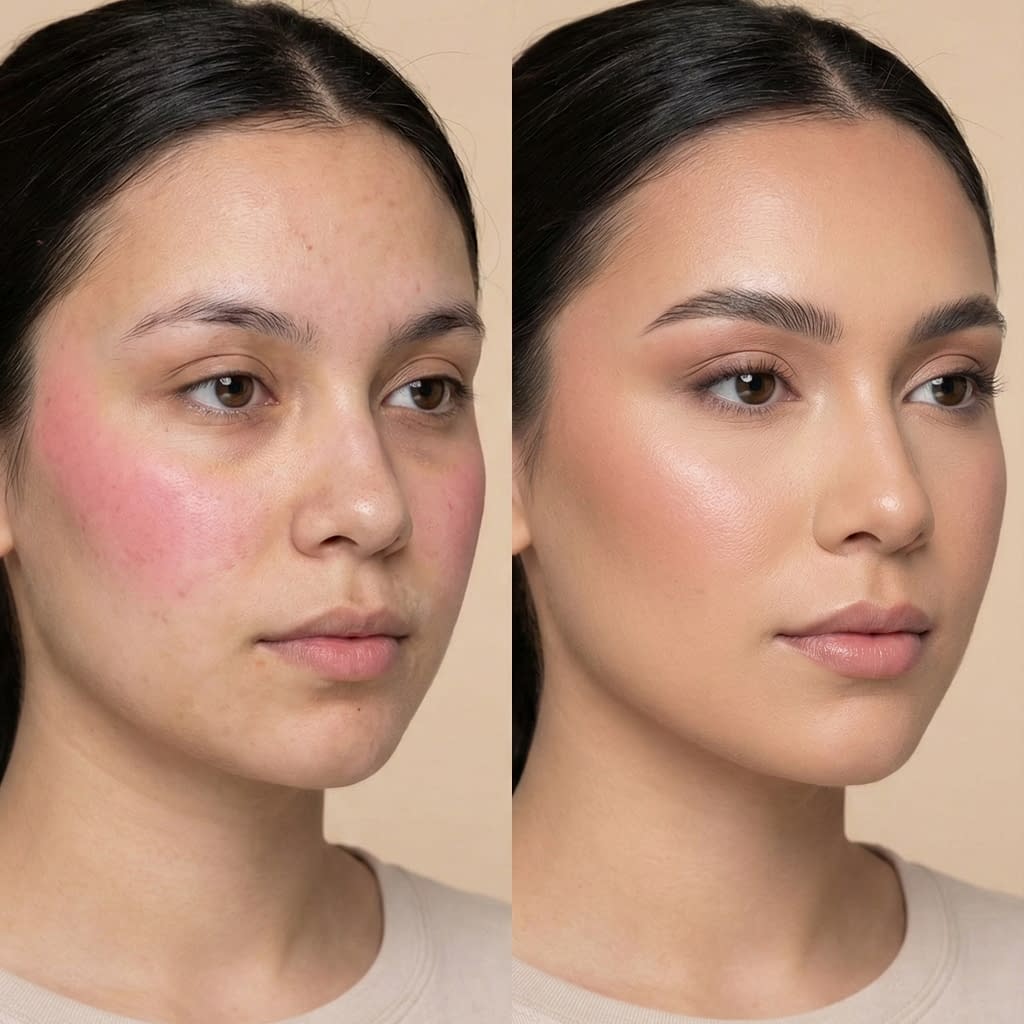
Use Less Product for a More Polished Finish
Heavy coverage often looks mask-like. Skin-like makeup is thin, focused, and blended.
How to reduce product without losing coverage (steps)
- Dot method: dot small amounts of foundation across the face (forehead, cheeks, nose, chin) and blend — don’t squeeze out a row of product.
- Spot-cover: use concealer only where needed (under-eye, blemishes) rather than coating the whole face.
- Thin layers: build up slowly; a second thin layer looks better than one thick one.
- Use multipurpose items: a tinted moisturizer or BB cream + concealer = less layering of products.
Rule of thumb: if you can see a heavy line of makeup on your jaw, you used too much.
Change Your Application Technique, Not Your Products
Small technique tweaks can transform the same product.
Technique swaps to try
- From brush to sponge: switch to a damp sponge to sheer and press product into the skin.
- From swiping to stippling: instead of swiping concealer, stipple/tap to deposit and blend.
- From powder-heavy to powder-light: set only oil-prone zones instead of the whole face.
- From buffing to pressing: press highlighter into high points with your ring finger for a natural glow.
Try one technique swap per makeup day and notice which gives the best lift.
Multi-Use Hacks for Products You Already Own
Stretch your kit — many products can pull double duty.
Smart multi-use ideas
- Cream blush as lip stain: a tiny dab on lips + finger blend gives a believable flush.
- Eyeshadow as contour: a matte cool brown shadow finely blended under cheekbones works as contour.
- Bronzer as light shadow: sweep a matte bronzer into the crease for dimension if you don’t own an eyeshadow palette.
- Translucent powder + tiny bit of cream bronzer = subtle cream bronzer (blend fast).
- Mascara for brow hairs: wipe a clean spoolie, put a drop of clear gel or mascara on it, and brush upward for brow hold.
Step-by-step: test hacks on the back of your hand first so you can refine color and texture.
How Lighting Affects the Way Your Makeup Looks
Light changes everything — learn to use it.
Lighting checklist
- Always check makeup in natural light before leaving the house. Bathroom bulbs are warm and forgiving; sunlight shows real results.
- Face the light when applying and taking selfies — avoid overhead light that casts shadows.
- Soft light helps blended looks: stand near a window or use a daylight lamp for the most accurate read.
- Adjust finish to light: matte for bright sun (less shine), subtle dew for soft indoor light.
Small habit: take a quick phone selfie in window light to preview how it will photograph.
Upgrade Your Base Without Switching Foundation
You can make your foundation look newer with a few tricks.
Base upgrades (step-by-step)
- Thin it down for a dewier finish: mix a pea-sized drop of facial oil or hydrating serum with your foundation on the back of your hand and blend as usual.
- Make it last longer: for oily areas, lightly dust a small amount of translucent powder only where needed, then finish with a setting spray.
- Correct undertone with what you have: if your foundation is too yellow, add a tiny dot of a cool-toned concealer to the center to neutralize; if it’s too pale, warm it up with a dot of bronzer mixed in.
- Use a primer where needed (not everywhere) to smooth texture and help makeup adhere.
These small changes let you adapt one foundation for different seasons or looks.
Small Brow Adjustments That Make a Big Difference
Brows frame the face — tiny tweaks read polished.
Brow polish routine (2–3 minutes)
- Brush brows up with a spoolie; trim any super-long hairs with small scissors if needed.
- Fill sparingly: use short hair-like strokes with a pencil or brows powder focused on sparse areas.
- Define lower edge: soften any harsh lines with a tiny brush or spoolie so brows look natural.
- Set: use a clear or tinted brow gel to lock hairs in place and add texture.
Tip: slightly thicker, softly defined brows lift and open the eye area in photos.
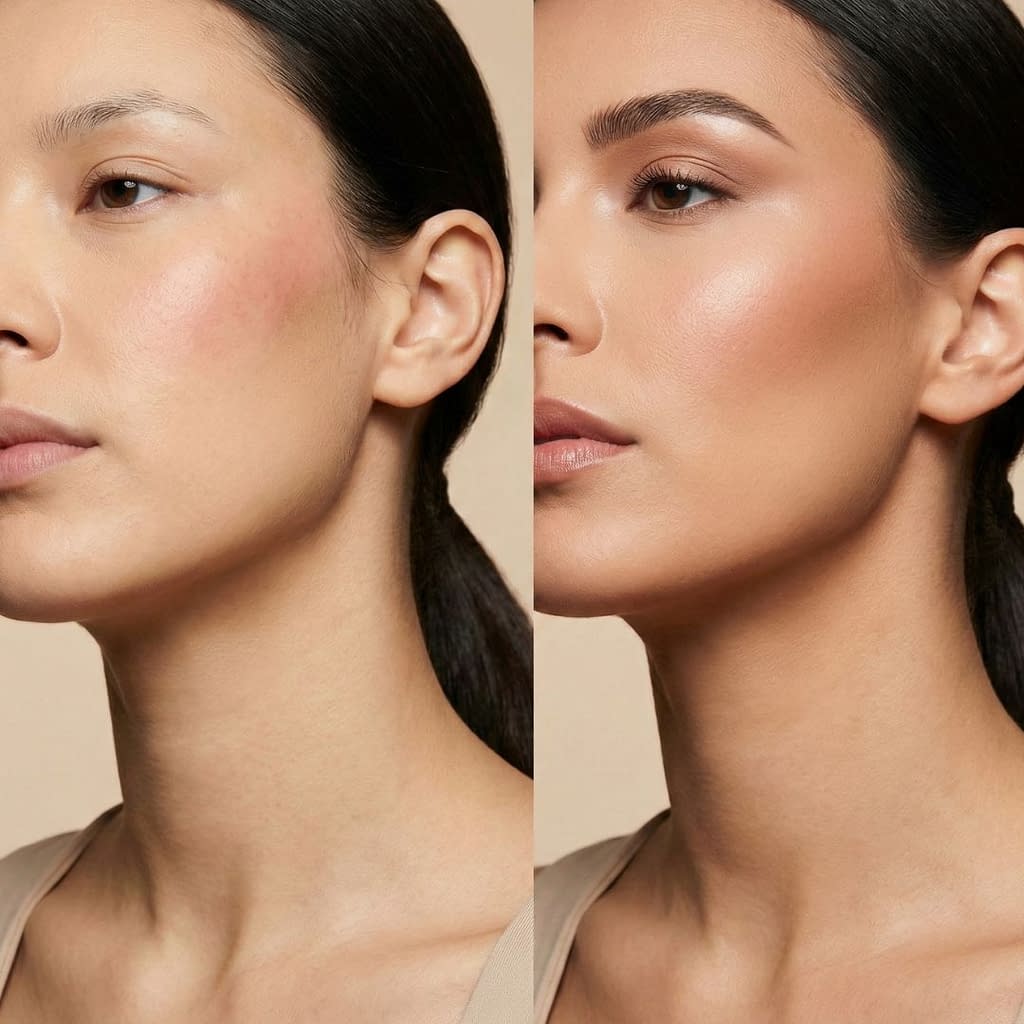
Placement Tricks That Lift and Define the Face
Where you put products matters as much as what you use.
Placement playbook
- Blush high on the cheekbone: sweep blush slightly upwards toward the temple for a lifted effect.
- Contour in an inverted triangle: shallow contour under the cheekbone into the temple and a whisper at the jawline for natural sculpt.
- Highlight strategically: highlight the cheekbone highest point, the inner corners of the eye, and the brow bone (tiny dots) — not the whole face.
- Conceal bright, not heavy: apply concealer in a triangle under the eye and blend downwards to avoid a floating crescent that can age.
- Lip darker at edges or lighter center: slightly darker outer shade with a lighter dab in the center gives dimension without a new product.
Practice: do one placement change at a time and compare left vs right in a mirror.
Make Affordable Makeup Look Expensive
Luxury looks come from finish and application, not price.
High-end finish tactics
- Blend until edges vanish. Luxury makeup looks seamless — no visible borders.
- Use a tiny bit of oil over dried powder for a dewy, skin-like sheen (not for oily skin).
- Layer textures: cream blush under powder blush or cream highlight under powder highlighter for depth.
- Focus on grooming: neat brows, trimmed lashes, and hydrated lips make any product read luxe.
- Keep tools clean: clean, well-cared-for brushes apply product smoothly.
When in doubt, less product + better blending = elevated result.
Clean Brushes and Tools: The Overlooked Game-Changer
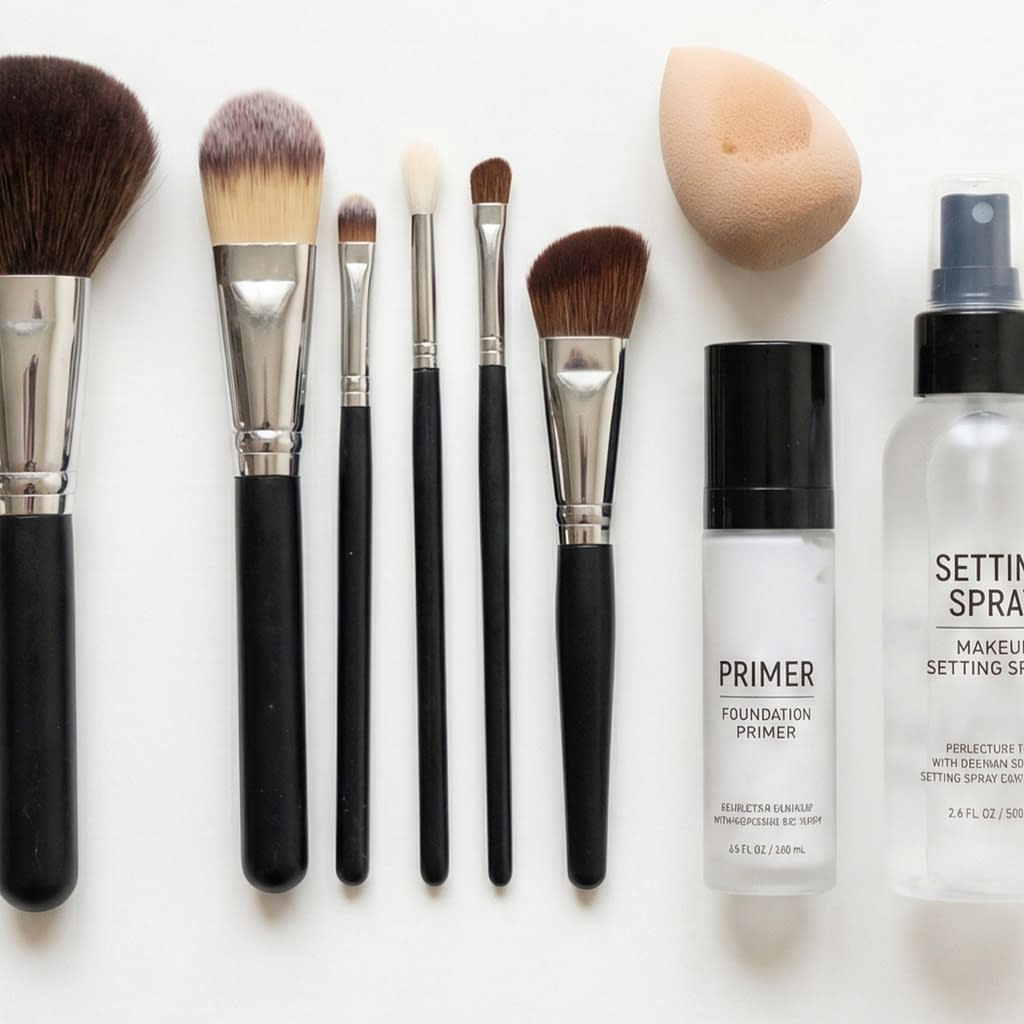
Dirty tools apply product patchily and mix old pigments into fresh looks.
Cleaning routine
- Quick clean once a week: spray brush cleaner and wipe on a towel.
- Deep clean monthly: wash brushes with gentle shampoo or brush cleanser, reshape, and air dry flat.
- Clean sponges after each use: quick rinse, squeeze, dry; deep-clean weekly.
- Change sponge every 1–3 months, brushes 6–12 months depending on quality.
Clean tools = smoother application, truer colors, and better skin health.
Fixing Makeup That Looks Dull or Heavy
Quick rescue moves for a mid-day or pre-photo fix.
Rescue steps
- Mist and press: spritz a hydrating setting spray and press lightly with a damp sponge to revive and melt layers.
- Blot then touch up: for shiny/oily spots, blot then reapply a tiny powder. For dullness, add a subtle cream highlighter to the high points.
- Rebalance color: tiny dot of cream blush (blended) can refresh a tired complexion.
- Brush up brows and mascara: quick grooming brightens the entire face.
Carry a small sponge and setting spray in your bag for instant fixes.
Building a Signature Look Using What You Have
A signature look makes you feel confident and reduces decision fatigue.
How to create one
- Pick 3 elements you love (e.g., natural skin, groomed brows, bold lip).
- Practice that combo until it’s quick (3–6 tries).
- Modify for occasions: slightly brighter lip for photos, softer for school/work.
- Keep a photo reference of your signature look in your phone for when you’re in a rush.
A signature routine helps you rely on skills, not impulse buys.
Final Words
Upgrading your makeup doesn’t require a shopping spree — it asks for better prep, smarter techniques, and intentional placement. Focus on skin prep, blend with purpose, use less product, and repurpose what’s in your kit. Clean tools, good lighting, and small placement tweaks will transform your everyday look. Try two changes from this guide for a week (for example: sponge instead of brush + high blush placement) and notice how much more polished you appear — without spending a cent.


