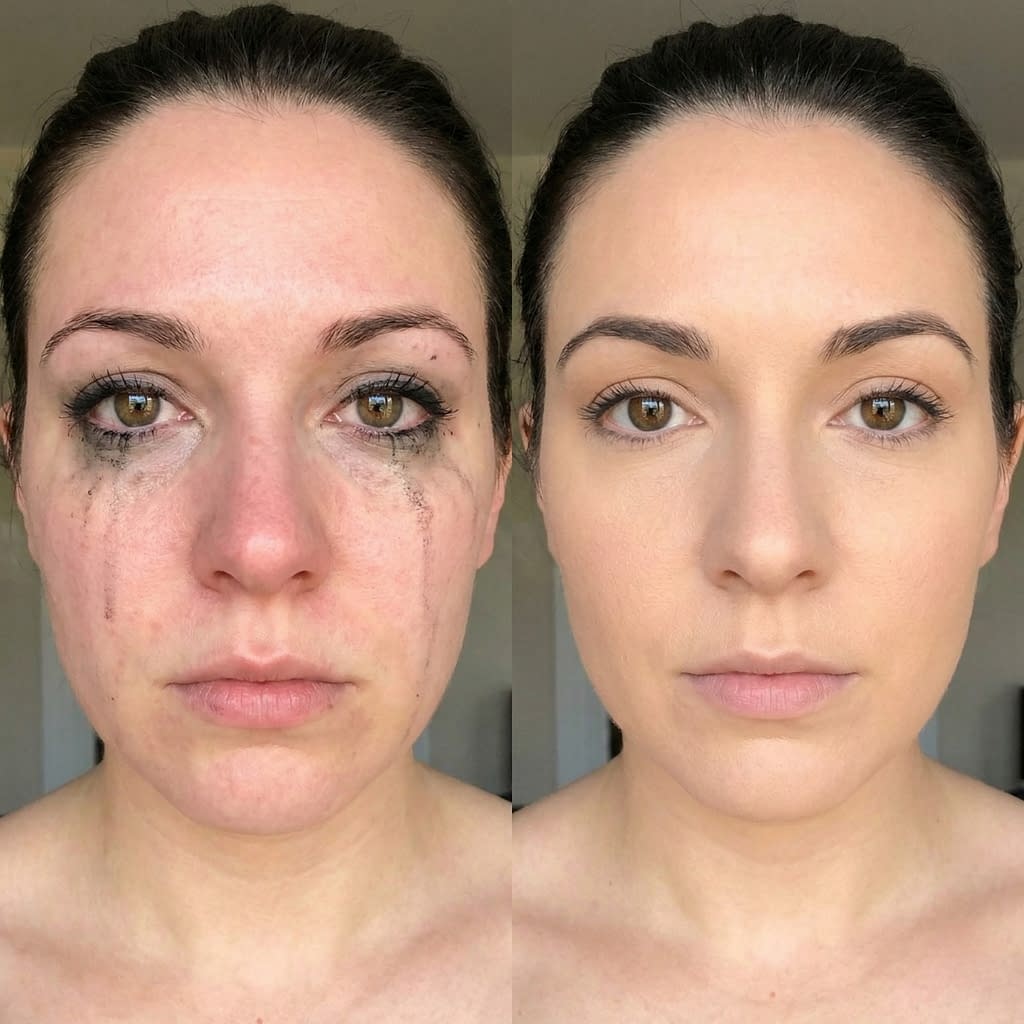
Crying wrecks your carefully applied makeup, but it doesn’t always mean you have to start from scratch. With calm assessment, clean technique, and a tiny emergency kit, you can often rescue your look in five minutes — or decide quickly when a fresh base is the better, faster route. Below is a full, practical guide that helps you: breathe, evaluate, repair (or restart) without panic, and leave with makeup that looks natural — not patched-on.
Why Crying Disrupts Makeup (and What to Do First)
Crying messes with makeup for a few simple reasons:
- Tears and running mascara physically wash away water-sensitive products.
- Rubbing, wiping or blotting spreads pigment and moves foundation.
- Salt and oil from tears and sweaty skin change how products adhere.
- Swollen, red eyes change your color map — concealer and eye makeup may no longer match.
First moves (do these before you touch your face):
- Stop crying and take a few slow breaths (see next section).
- Pat — don’t rub — the wet areas with a clean tissue to remove excess moisture. Use gentle pressing motions.
- Step back for 30–60 seconds so swelling settles a little; working on puffy eyes makes mistakes more likely.
If you jump straight into scrubbing, you’ll create more work. Calm first, fix second.
Take a Breath: Immediate Calm-Down Steps Before Touching Your Face
Your hands and your head need to be steady.
Mini calm routine (60 seconds)
- Find a seat and inhale slowly for four counts, hold for two, exhale for six — repeat twice.
- Wash your hands or sanitize them — you’ll be touching delicate skin.
- Pat your face very gently with a clean tissue to remove most of the tears — don’t rub.
- If your eyes sting, blink gently and look down for a moment; avoid touching or rubbing the lashes.
A steady hand and a calmer face = easier, cleaner repairs.
Assess the Damage: When You Can Repair vs. When to Restart

Quick damage checklist (ask yourself)
- Is your skin only slightly damp and makeup mostly intact? — Repair.
- Is mascara running into big black streaks and foundation smeared across cheeks? — Possibly repair, but be prepared to restart.
- Is your base cakey, patchy, or rubbing off in many places? — Restart.
- Are there open, raw spots or irritation? — Stop — no makeup (clean and soothe).
Helpful rule: if fix will take more time than a fresh, quick wash-and-base redo (or you have the privacy to wash), restart. Otherwise, repair.
Quick 5-Step Emergency Repair Routine
A fast rescue you can do in 5–10 minutes.
- Blot & remove surface water — gently press tissue into wet areas.
- Fix mascara first — it’s the most obvious; remove smudges with precision (see next section).
- Spot clean foundation — use a damp cotton swab or micellar water on trouble zones (see “Repairing Foundation” below).
- Rebuild under-eye with a tiny dab of concealer and light powder to avoid creasing.
- Finish with light setting spray and gentle touch-ups for lips/cheeks.
Work from eyes outward and use minimal product — that keeps things natural.
How to Gently Remove Smeared Mascara Without Ruining Base Makeup
Removing mascara is the messiest part — do it carefully.
Step-by-step mascara rescue
- Use a clean cotton swab dipped in oil-free micellar water or an oil-based eye remover depending on how waterproof the mascara is. If your base is water-sensitive, prefer micellar water (less oily).
- Close your eye and gently roll the swab along the smudge — small, controlled strokes from the lash line outward. Don’t press or rub the lid.
- Use multiple clean swabs as pigment transfers — switch to a fresh swab when it gets dirty.
- If little dots remain on the under-eye area, dampen a fresh swab with water and pick them off gently.
- Comb lashes with a clean spoolie to remove clumps; if mascara is clumpy on lashes, you may need to remove mascara from lashes entirely and reapply a thin coat later.
Tip: do lashes first so you don’t spread black streaks while repairing the rest of your face.
Fixing Watery or Smudged Eye Shadow and Eyeliner
Eyes come next once mascara is tidy.
Repair eyes step-by-step
- Remove large smears with a slightly dampened cotton swab (micellar water) — press, don’t drag.
- Tap on a bit of translucent powder under the eye to absorb moisture and set remaining product (use a small brush and press).
- Reapply a light wash of shadow if color faded — use a tiny brush and build slowly. For cream shadows, warm a little on the back of your hand and tap onto the lid.
- Redraw eyeliner carefully with a waterproof pencil or thin liquid liner; work in small strokes, not long sweeps.
- Finish by curling lashes gently (if lashes are clean) and reapplying one thin coat of mascara if needed.
Keep movements delicate — the goal is to rebuild depth without dragging pigment across still-wet areas.
Repairing Foundation and Concealer After Tears
Foundation is salvageable in many situations.
Spot-repair method
- Assess: if foundation is mostly uniform with only damp patches, spot repair. If it’s streaky everywhere, wash off and restart.
- For small wet patches: use a clean, dampened cotton swab (micellar water) to very gently lift the excess product from the skin — press and roll the swab. Blot with tissue.
- Apply thin layers of your foundation/concealer to the cleaned spot with a small stippling brush or a damp sponge — press the product into the skin to blend with surrounding area.
- Set the repaired spot with a tiny amount of translucent powder pressed in with a sponge or puff.
- If under-eye concealer is creased or patchy: lightly pat a little lightweight concealer only into the crease and set; avoid heavy layers that settle into lines.
Avoid adding heavy product over large areas — match texture and sheerness to what remains.
Blush, Bronzer and Highlight: How to Rebuild Natural Color
Color can be rebuilt quickly without looking artificial.
Step-by-step cheek recovery
- Blot the area lightly if damp.
- Use cream products sparingly, as they rehydrate and blend easily onto existing base — tap a tiny amount on with fingers or a small brush.
- Blend outward in short, soft strokes to avoid hard edges.
- Set cream with a dusting of powder if you expect more tears or humidity.
- For highlight, use a light hand — maybe skip a high-shine highlight after crying, because skin may be textured or swollen. A soft satin finish looks more natural.
Aim for fresh, slightly flushed — not heavily sculpted.
Lip Recovery: From Smudged to Polished Fast
Lips are easy to fix quickly.
Lip repair options
- If color is slightly smeared: blot with tissue, then press a little translucent powder through a tissue to set, and reapply a thin swipe of lipstick or stain.
- If color is mostly wiped off: quickly exfoliate lip surface with a damp cloth to remove flakes, dab a touch of balm, blot, then re-line and fill the lips.
- If you’re short on time: use a tinted balm or stain for fast, natural recovery.
Tip: a lip liner filled all over before lipstick makes touch-ups easier (prevention tip for next time).
Patch-Fixing vs. Full-Blend: Tools and Techniques to Seamlessly Rework Areas
Choose patch fixes when damage is localized; do a full blend when multiple areas are affected.
Patch-fix toolkit
- Small synthetic brush for concealer
- Damp mini sponge for pressing product
- Translucent powder and a small puff
- Clean cotton swabs and micellar water
Patch method
- Clean the specific spot with a swab.
- Apply thin product with a small brush, pressing to blend edges into surrounding makeup.
- Set with pressed powder only where needed.
Full-blend approach
- If several areas are affected, consider washing the face with a mild cleanser, pat dry, then reapply a light base using a tinted moisturizer or skin tint to match your existing finish.
- Rebuild eyes/cheeks as above.
If a patch fix looks obvious, it’s usually faster and cleaner to restart the base.
Quick Touch-Up Kit: What to Carry for Emergency Repairs

Put these small items in a tiny pouch for real-life emergencies:
- Travel micellar water or oil-free makeup remover wipes
- Cotton swabs and a few tissues
- Mini translucent powder compact + small sponge/puff
- Small concealer brush and a mini tube of concealer or foundation (travel size)
- Small pencil liner and mini mascara (waterproof)
- Lip balm and a small lip color (tint or bullet)
- Mini setting spray or facial mist
A compact kit like this lets you fix most crying incidents in a restroom or car.
When It’s Better to Start Fresh — Signs You Should Wash It Off
Restart if:
- Makeup is smeared all over and patch fixes still look uneven.
- You have raw, irritated, or broken skin under makeup — wash and soothe first.
- Foundation is cakey or flaked in many places — a wash prevents piling when you reapply.
- You have time and privacy to reset — a fresh base is often quicker and more natural than painstaking spot fixes.
If you choose restart: wash gently, apply a thin, breathable base (tinted moisturizer or skin tint), and rebuild eyes/lips simply.
Post-Repair Setting Tricks That Help Makeup Last Longer
After repairs, lock everything in.
Setting steps
- Press a bit of translucent powder on oily zones with a puff (don’t overdo it).
- Finish with a light mist of setting spray held 8–10 inches away — one or two spritzes is enough. Let it dry naturally.
- Blot gently if skin will be emotional again (carry blotting papers). Touch-ups are easier on a set surface.
Setting reduces transfer and gives your patched areas time to fuse into the rest of your makeup.
Prevention Tips: Products and Techniques to Reduce Damage Next Time

Beating the problem before it starts is the best plan.
Prevention checklist
- Use waterproof mascara and long-wear eyeliners if you expect tears.
- Set concealer under eyes with a thin powder to reduce creasing.
- Use a small amount of setting spray after you finish makeup for a flexible shield.
- Fill and prime lips with liner to make reapplication easier.
- Carry a tiny emergency kit (see above) so you aren’t stuck without supplies.
- Avoid heavy creams around the eyes on days you’re emotional — lightweight, breathable formulas resist smudging better.
A tiny amount of prep saves time and stress later.
Final Words
Crying is human — and your makeup can survive it. The right combination of calm, cleanliness, precision, and smart products lets you repair most emergencies in minutes. Repair when damage is local; restart when the whole base is compromised or skin is irritated. Carry a small touch-up kit, practice gentle removal techniques (micellar water and cotton swabs are your friends), and set your fixes so they last. Most importantly: be kind to yourself. Makeup can be fixed; feelings are valid.


