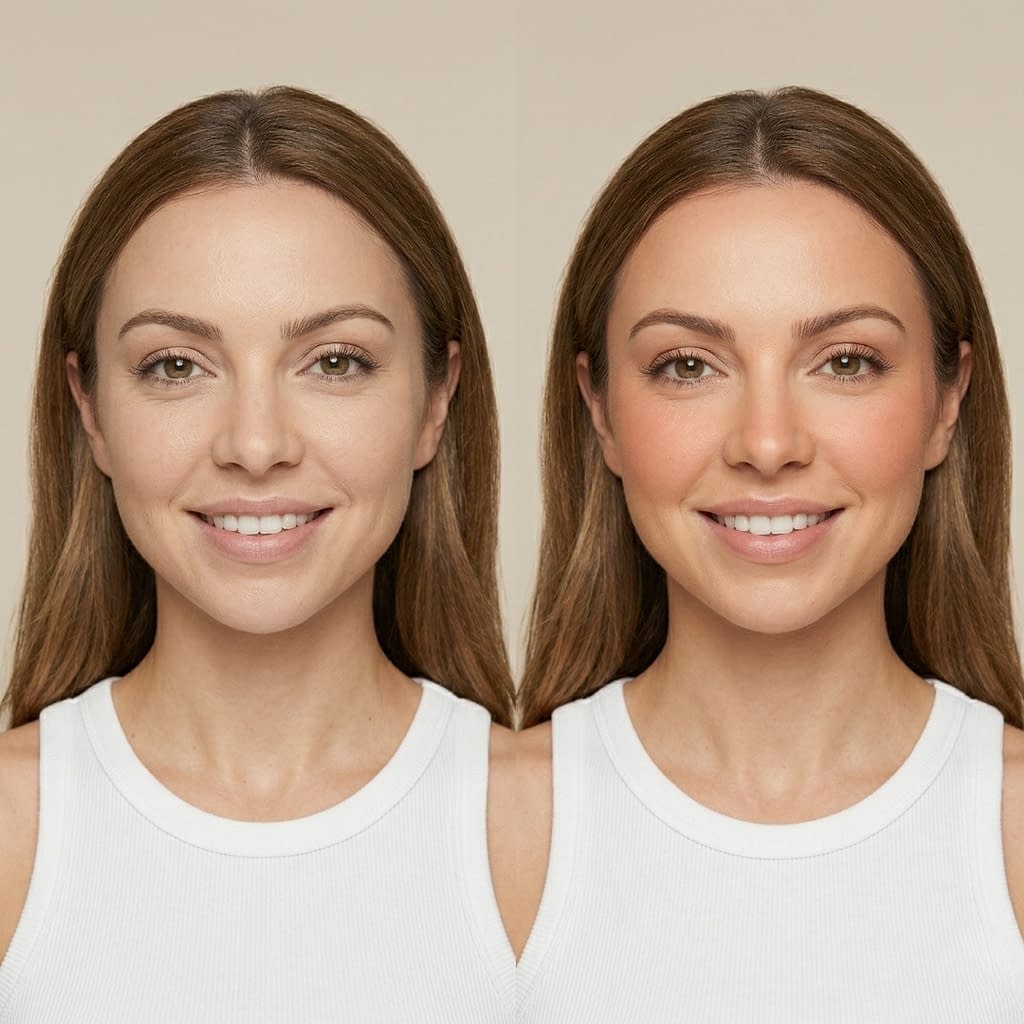
Blush has the power to completely change the mood of your makeup. The right placement can make your face look fresher, healthier, softer, and more lifted, while the wrong placement can make blush look heavy, harsh, or obviously “done.” That is especially important in summer, when makeup usually looks best if it feels light, effortless, and naturally radiant.
A sun-kissed blush look is not about putting color on the cheeks in the same old spot every time. It is about using placement to mimic the way your skin naturally looks after a little time in the sun. A soft flush across the higher points of the face can give you that fresh, glowing, just-back-from-outdoors effect without making your makeup look too bold or overapplied.
In this guide, you will learn exactly where to place blush for a natural summer look, how to blend it so it looks seamless, how to match it with bronzer and highlighter, and how to keep it looking fresh all day long. Whether you love cream blush, powder blush, or a mix of both, these tips will help you create a soft, radiant finish that feels effortless and flattering.
Why Blush Placement Changes the Look of Your Face
Blush placement matters because the face is shaped by light, shadow, and color. Even the same shade of blush can look completely different depending on where you place it. A higher placement can lift the face, a wider placement can make the cheeks look softer, and a lower placement can change the way your features appear overall.
Where you apply blush affects how people visually read your face. It can make your cheeks look rounder, longer, more sculpted, more youthful, or more relaxed. That is why blush is not just a finishing touch. It is a shaping tool.
Step by step: how placement changes the face
- Blush adds color where the eye naturally goes first.
- Higher placement can make the face look lifted.
- Wider placement can create a softer, sun-kissed effect.
- Lower placement can pull the face down if applied too low.
- The final result depends on shape, technique, and blending.
If you want a natural summer glow, placement matters just as much as the shade itself.
How Summer Makeup Differs from Everyday Blush Application
Summer makeup usually calls for a softer, more breathable look. Heavy layers can feel sticky in heat, and strong makeup can look less natural under bright sunlight. That means blush application often needs a lighter hand and a more strategic placement during warm weather.
In summer, blush often works best when it looks like a natural flush rather than a very precise stripe of color. The goal is freshness, not obvious contouring with pink.
Step by step: how summer blush differs
- Use lighter layers than you might use in colder months.
- Choose formulas that melt into skin instead of sitting on top.
- Focus on areas that mimic natural warmth from the sun.
- Blend more softly so the edges disappear into the skin.
- Build color gradually instead of applying too much at once.
Summer makeup should look easy and airy, and blush placement plays a huge role in that effect.
The Best Places to Apply Blush for a Sun-Kissed Effect
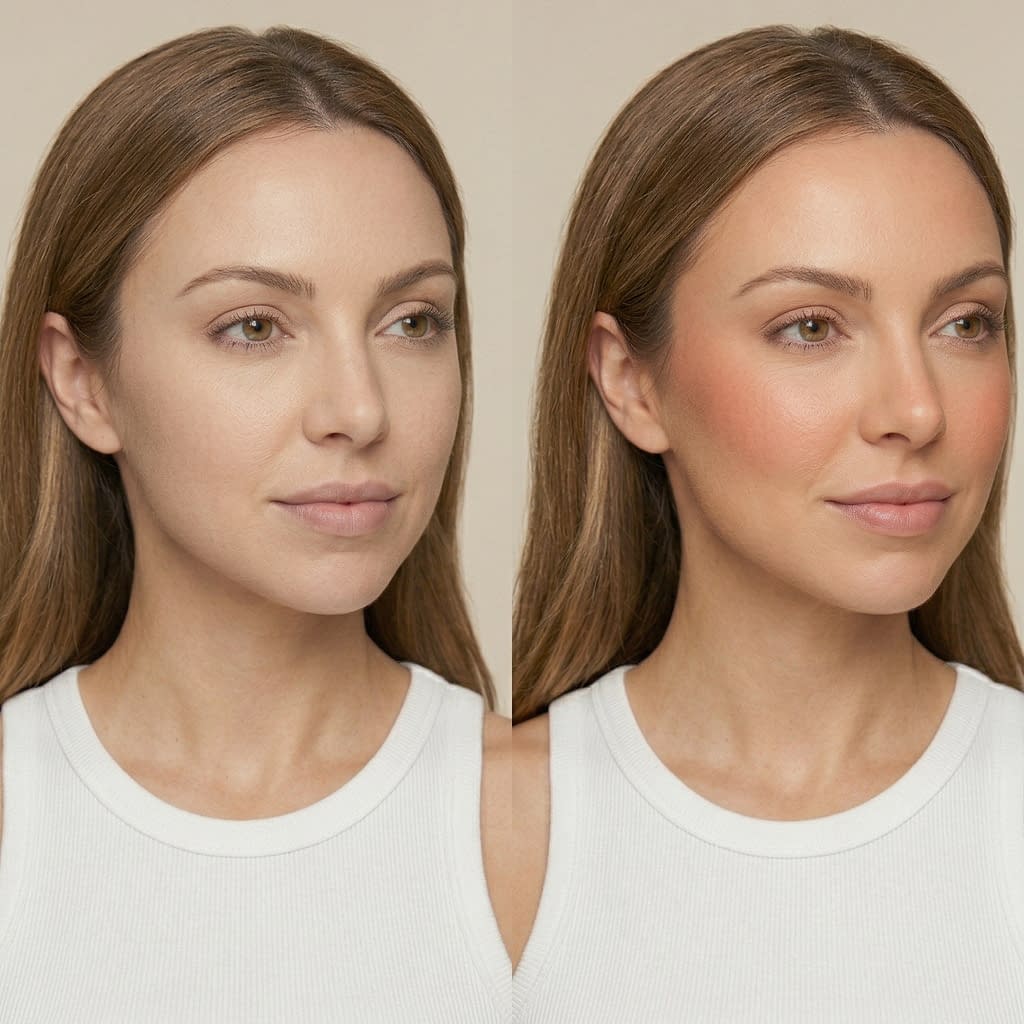
A sun-kissed blush look usually works best when the color sits slightly higher and a little more spread out than traditional blush placement. Instead of only placing it on the apples of the cheeks, you want it to look like the sun naturally kissed the face.
Best placement areas
- The tops of the cheeks
- Slightly across the bridge of the nose
- The upper outer cheek area
- Lightly toward the temples for a more diffused glow
Step by step: sun-kissed blush placement
- Start on the upper part of the cheek, not too low.
- Sweep the color slightly outward and upward.
- Add a very soft touch across the nose if you want a more naturally sun-flushed look.
- Blend the edges so the blush does not look like a circle.
- Step back and check the balance in natural light.
This placement gives the face a warm, outdoorsy look that feels fresh instead of overly polished.
How to Make Blush Look Natural Instead of Too Heavy
Blush looks natural when it seems to come from within the skin rather than sit on top of it. Heavy blush usually happens when too much product is used, the color is too intense, or the edges are not blended enough.
Step by step: make blush look natural
- Start with a tiny amount of product.
- Apply to the cheeks in light layers.
- Blend immediately with a brush, sponge, or fingertips.
- Add more only if needed.
- Keep the color soft enough that your skin still shows through.
Helpful tips
- Use sheer or buildable formulas
- Apply in daylight so you can see the true effect
- Match the intensity to the rest of your makeup
- Keep the focus on healthy color, not obvious placement lines
Natural blush should look like a glow, not like a block of pigment.
Cream Blush vs Powder Blush for a Fresh Summer Glow
Both cream and powder blush can work beautifully in summer, but they create slightly different finishes.
Cream blush
Cream blush tends to look more dewy and skin-like. It melts into the complexion and often gives the most natural sun-kissed effect.
Powder blush
Powder blush gives a more set, matte, or softly polished finish. It can be great if your skin gets oily or if you want more staying power.
Step by step: how to choose
- Choose cream blush if you want a fresh, glowing finish.
- Choose powder blush if you want longer wear and less shine.
- Use cream first and powder lightly over it if you want both glow and staying power.
- Match the formula to your skin type and the weather.
- Test how the blush behaves after a few hours in the heat.
For many summer looks, cream blush gives the most natural flush, while powder is best for control and longevity.
How to Choose the Right Blush Shade for Warm Weather
The right shade can make a huge difference in whether your blush looks fresh or overwhelming. In summer, softer warm tones often look especially flattering because they mimic the natural warmth of sun-touched skin.
Great summer blush shades
- Peach
- Coral
- Warm pink
- Rosy nude
- Soft terracotta
- Apricot
- Warm berry for deeper skin tones
Step by step: how to pick the right shade
- Look at your skin undertone.
- Choose a shade that complements your natural warmth.
- Pick a lighter version of bold shades if you want a softer finish.
- Test the blush on bare skin or over a light base.
- Make sure the shade looks like a flush, not a costume color.
The best summer blush should brighten the face without overpowering it.
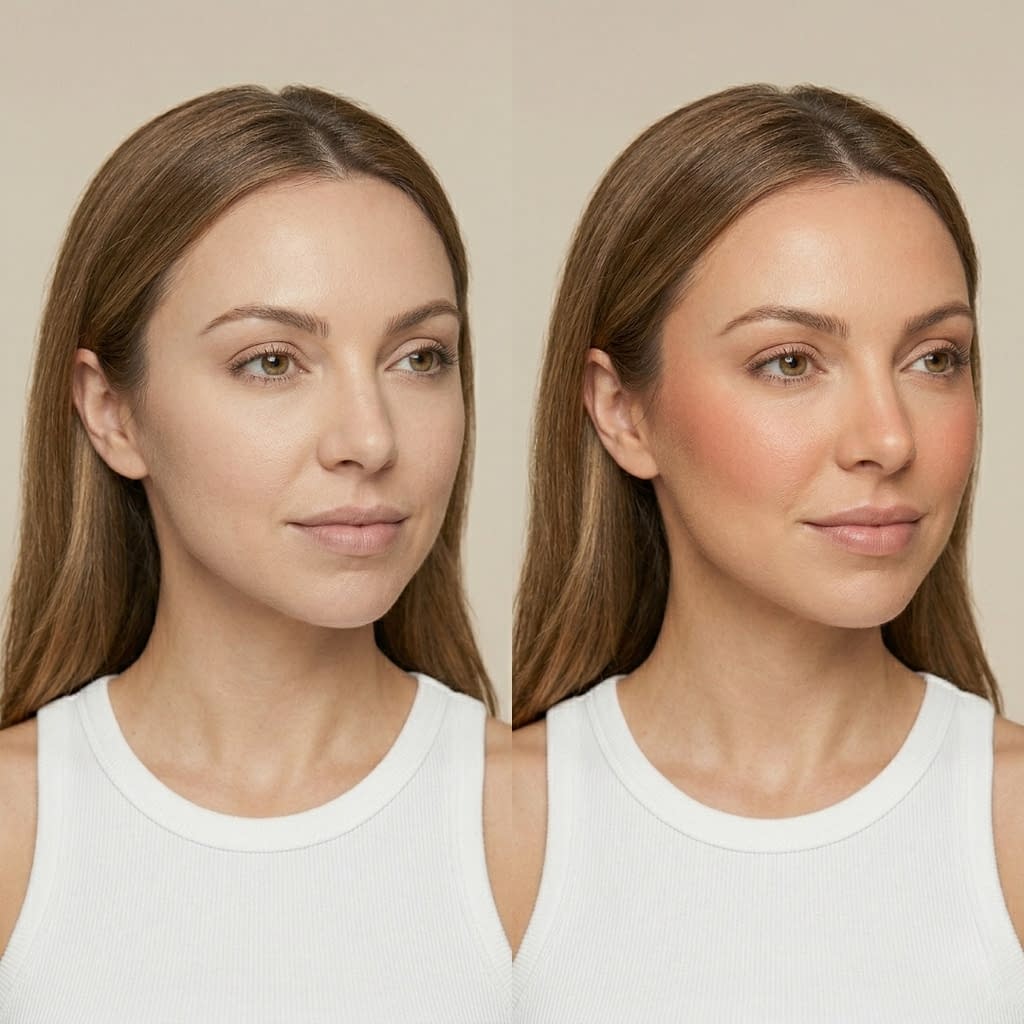
Where to Place Blush for a Lifted, Youthful Look
If your goal is a more lifted look, placement matters even more. Blush can create the illusion of higher cheekbones and a more refreshed face when applied in the right area.
Best placement for lift
- Higher on the cheekbones
- Slightly angled upward toward the temples
- Not too low on the cheeks
- Kept above the widest part of the face
Step by step: lifted blush placement
- Find the top part of your cheekbone.
- Place the blush slightly above the center of the cheek.
- Sweep upward instead of straight across.
- Blend toward the temple to create a lifted shape.
- Avoid applying too low, which can drag the face down visually.
This technique is especially flattering when you want blush to act like a soft lifting effect without looking sculpted or overdone.
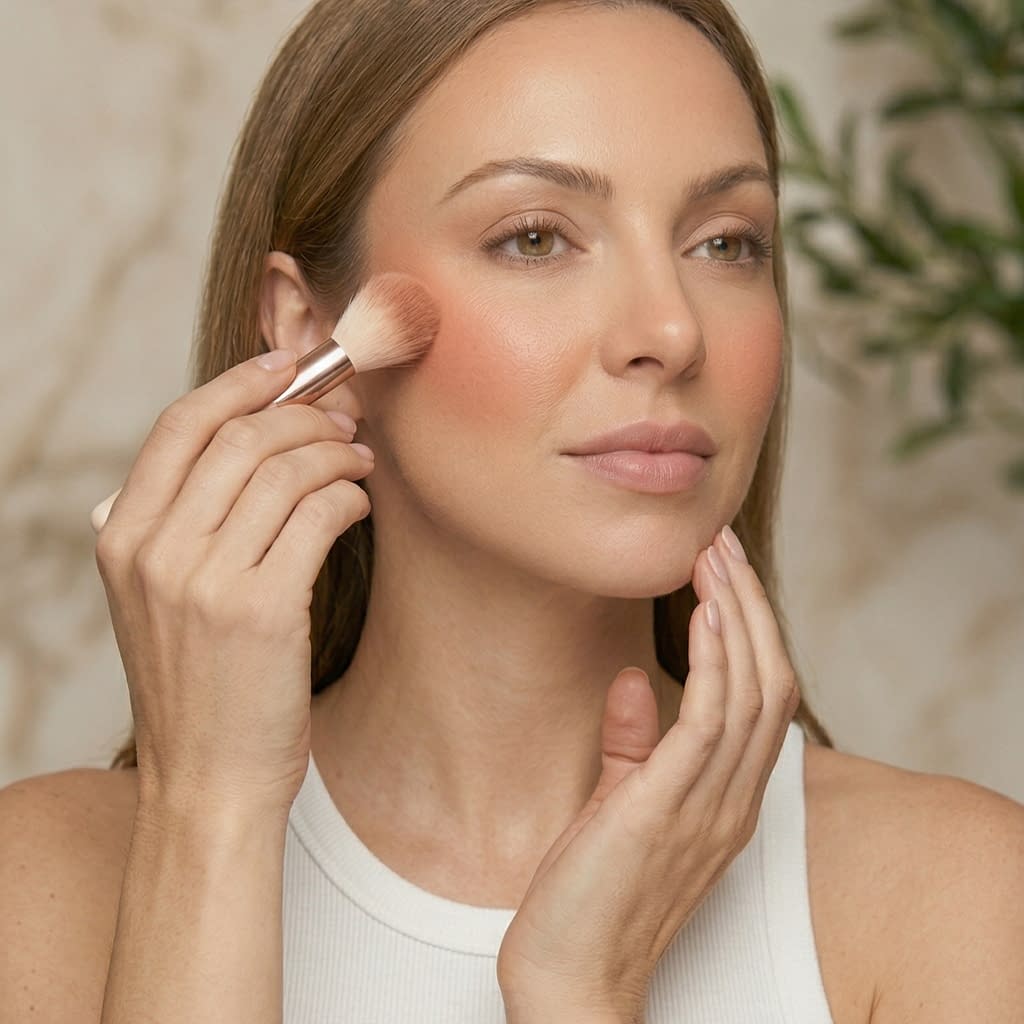
How to Blend Blush for a Soft, Seamless Finish
Blending is what transforms blush from obvious color into a natural-looking flush. Even perfect placement can look too strong if the edges are not softened properly.
Step by step: blending routine
- Apply the blush lightly.
- Use a clean brush, sponge, or fingertips to soften the edges.
- Blend in small circular or tapping motions.
- Check from multiple angles.
- Add a second thin layer only after the first is fully blended.
Blending tips
- Use a fluffy brush for powder blush
- Use tapping motions for cream blush
- Blend upward for lift
- Keep the edges diffused so the color disappears into the skin
A soft blend is what makes summer blush look believable and light.
Blush Placement Tips for Different Face Shapes
Different face shapes benefit from slightly different blush placement. The sun-kissed effect can still work for everyone, but small adjustments help the blush flatter your features better.
Round face
Place blush a little higher and more outward to create the illusion of lift and length.
Square face
Soften the look by blending the blush slightly more toward the center of the cheeks with rounded edges.
Oval face
Most placements work well, but a high, soft sweep creates the most naturally lifted effect.
Heart-shaped face
Focus blush a bit lower on the cheeks and blend outward to balance a wider forehead.
Long face
Place blush more horizontally across the cheeks to visually shorten and soften the face.
Step by step: face-shape placement
- Identify your face shape.
- Choose the placement that balances your proportions.
- Keep the edges soft.
- Test the shape in natural light.
- Adjust slightly based on what looks most flattering to you.
The right placement should enhance your features without looking forced.
How to Match Blush with Bronzer and Highlighter
Blush, bronzer, and highlighter work best when they look connected, not competing with each other. For a natural summer glow, each product should have its own role.
How they work together
- Bronzer adds warmth and soft dimension
- Blush adds healthy color
- Highlighter adds light and glow
Step by step: how to combine them
- Apply bronzer first to warm up the face.
- Add blush slightly above or beside the bronzed area.
- Apply highlighter only to the highest points of the face.
- Blend the borders so the products melt into each other.
- Keep all three soft enough to avoid a heavy makeup look.
When these products are balanced properly, the face looks naturally sunlit rather than heavily contoured.
Common Blush Mistakes That Ruin a Natural Sun-Kissed Look
A few common mistakes can make blush look too strong or unnatural.
Mistakes to avoid
- Placing blush too low
- Using too much product at once
- Choosing a shade that is too bright
- Failing to blend the edges
- Applying blush too close to the nose in a heavy stripe
- Mixing too many strong products together
Step by step: how to avoid these mistakes
- Start light.
- Apply blush higher on the face.
- Build slowly.
- Blend thoroughly.
- Check the final look in natural light.
Blush should look like a warm flush, not a painted-on shape.
How to Keep Blush Fresh and Long-Lasting in Summer Heat

Heat, humidity, and sweat can shorten blush wear time. To keep your makeup looking fresh, your skin prep and formula choice matter.
Step by step: long-lasting blush routine
- Start with clean, moisturized skin.
- Use a lightweight base or primer if needed.
- Choose a long-wear cream or powder formula.
- Layer thinly for better staying power.
- Set lightly if your skin gets oily.
Extra tips
- Use cream blush on top of a lightly set base for grip
- Avoid very slippery skincare right before makeup
- Carry a small touch-up product if needed
- Blot before reapplying rather than layering on top of sweat
Good prep helps your blush stay luminous instead of disappearing.
Easy Touch-Up Tips for Flawless Blush All Day
If your blush starts fading, touch-ups should be quick and subtle. The goal is to revive the glow, not rebuild the entire makeup look.
Step by step: quick touch-up
- Blot any sweat or oil first.
- Add a tiny amount of blush with your fingers or a small brush.
- Blend the edges immediately.
- Add a touch of setting powder only if needed.
- Check that the color still looks soft and natural.
Best touch-up habits
- Use small amounts
- Focus on the center of the color, not the edges
- Keep a cream blush stick or compact in your bag
- Reapply only where the color has faded
A light refresh is often enough to bring the whole face back to life.
How to Create a Healthy, Radiant Summer Makeup Look
Blush looks best when the rest of your makeup supports that fresh, healthy finish. In summer, skin-like makeup usually works better than full-coverage, heavily sculpted looks.
Step by step: build a radiant summer face
- Start with skincare that hydrates without making skin greasy.
- Use a light base or tinted product if desired.
- Add bronzer for warmth.
- Place blush high and softly for a sun-kissed effect.
- Finish with a natural-looking glow on the high points.
Helpful mindset
- Let your skin still show through
- Keep the makeup soft and breathable
- Focus on freshness over perfection
The most beautiful summer makeup often looks like healthy skin with just a little enhancement.
Final Words
Blush placement can completely change the energy of your makeup, especially in summer when the goal is usually to look fresh, warm, and naturally glowing. By choosing the right placement, using the right shade, and blending it softly into the skin, you can create a sun-kissed look that feels effortless instead of overdone.
The best summer blush look is all about balance. Place the color high enough to lift the face, soft enough to feel natural, and light enough to keep the skin looking breathable and radiant. When you match blush with bronzer and highlighter carefully, the whole face comes together in a way that looks healthy and sunlit.
If you keep the application soft, the shade flattering, and the finish seamless, blush becomes one of the easiest ways to create that beautiful summer glow.


