Glasses are a stylish, practical accessory — but they do change the way makeup reads. Lenses and frames cast shadows, hide parts of your eye, and can magnify or minimize features depending on your prescription. The good news: a few smart tweaks to your routine make your eyes look bigger, your skin look smoother behind lenses, and your overall look balanced and polished. Below is a friendly, detailed playbook you can follow (with step-by-step instructions) whether your frames are bold, thin, oversized, or cat-eyed.
Why Glasses Change Your Makeup Game
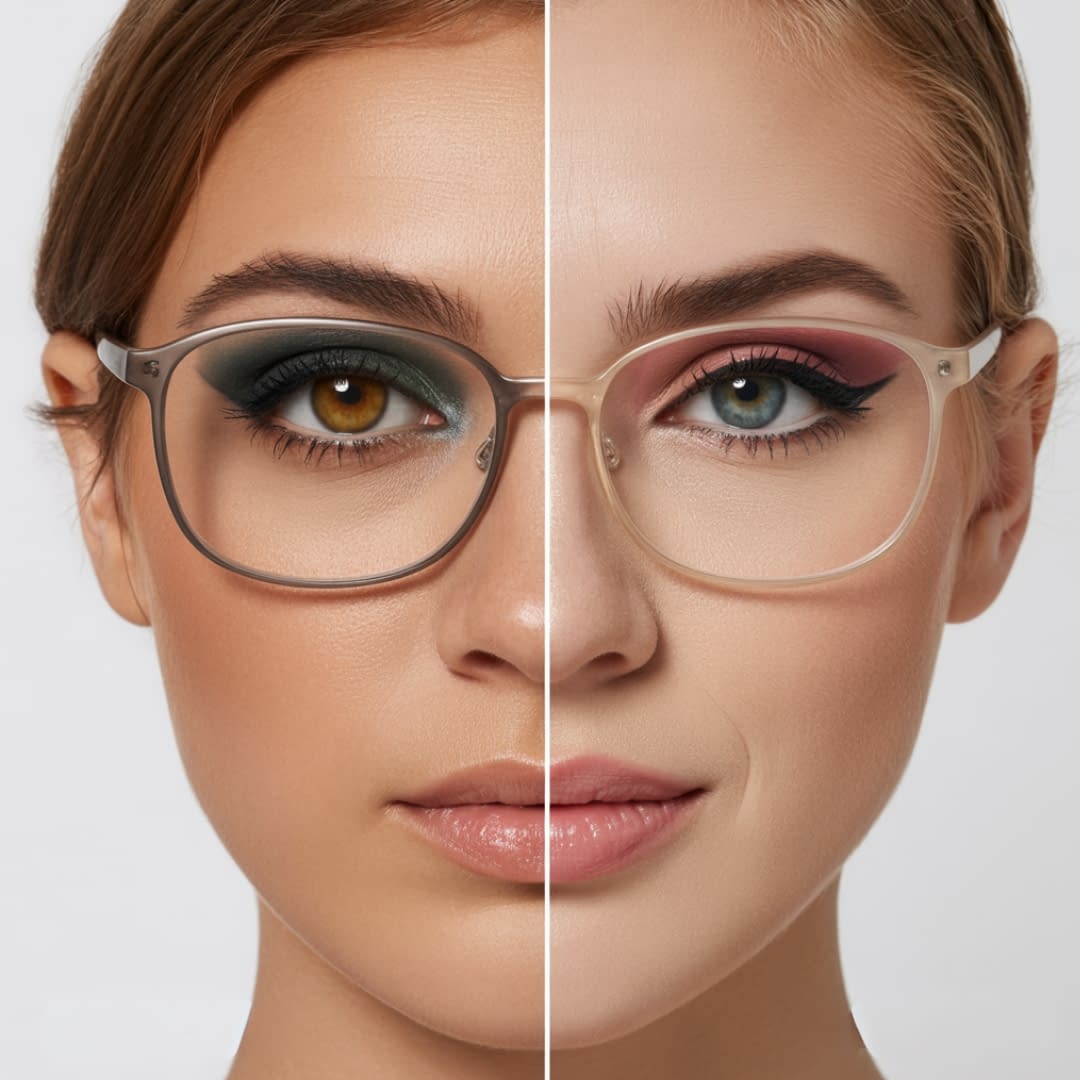
Glasses aren’t passive: they alter how people see your face. Frames create a border that draws attention to certain areas; lenses can reflect light or cast shadows; and prescription lenses can magnify (hyperopia / farsightedness) or minify (myopia / nearsightedness) your eyes. That means the same makeup that looks great without glasses might look washed out, too heavy, or unbalanced once lenses are on.
Key consequences:
- Shadows at the bridge and under the eye area.
- Frames that emphasize or hide brow shape.
- Lashes that can touch or smudge lenses.
- Color and contrast that may need to be intensified or softened.
Aim: enhance the eyes so they don’t disappear behind frames, minimize glare and smudging, and keep the rest of the face balanced so your frames become a flattering part of your look.
Start With a Flawless Base
A smooth, even complexion is essential because glasses focus attention on the center of the face.
Step-by-step:
- Prep & prime — cleanse, tone, and apply a lightweight, hydrating primer. Choose a formula that smooths pores and controls oil in the T-zone to prevent makeup sliding onto lenses.
- Correct discoloration — use a color corrector sparingly (peach/orange for dark under-eyes, green for redness) applied with a small brush or fingertip and gently blended.
- Conceal strategically — apply concealer in a triangle under the eye rather than a narrow line; this brightens more naturally and reduces the shadowing effect from glasses.
- Foundation application — pick a foundation with the finish you like (natural/matte/dewy). Apply thin layers—start light and build coverage only where needed. Use a damp sponge for seamless blending into the nose bridge and under the glasses.
- Set where necessary — lightly set the under-eye and the bridge with a finely milled translucent powder to prevent transfer onto lenses. Don’t over-powder the whole face; a matte, cakey finish looks heavy behind frames.
- Finish with a light mist — a setting spray (light mist) helps meld layers so makeup sits better under frames and resists rubbing.
Tips:
- Use products that won’t crease under the pressure of frames.
- If you wear readers or tight frames, avoid heavy textures at the bridge — they can cake.
Focus on the Eyes: Make Your Eyes Pop

Glasses frame the eyes, so make those eyes intentional and visible.
Step-by-step:
- Prime lids — a lightweight eye primer prevents creasing and intensifies pigment so eyes show through lenses.
- Choose contrast — glasses can dim eye color. Use mid-tone to slightly deeper shadows in the crease to add depth (unless your frames are very small—then keep it softer).
- Lid color — apply a lighter, slightly reflective shade on the lid (satin or soft shimmer) to catch light and create perceived depth behind the lens.
- Transition shade — blend a warm or neutral transition color in the crease to avoid harsh lines that can look muddied behind frames.
- Outer V — add a slightly deeper shade at the outer V to lift and define; blend well so there’s no hard edge visible through lenses.
- Avoid heavy glitter directly on the lid if it reflects into the lenses; fine, satin shimmer is preferable.
Tips:
- If your lenses are magnifying (eyes look larger), soften contrast; if they minify, increase pigment slightly so eyes read at the right scale.
- For small frames, focus on brighter inner lids and subtle definition; for large frames, you can go bolder with contouring and color.
Define Your Brows for Framed Faces
Brows balance the frame and keep attention at the right level.
Step-by-step:
- Assess shape — your frames may sit over or below your natural brow line. If frames sit low, keep brows tidy and gently filled to avoid too much clutter in the same horizontal visual space.
- Fill strategically — use short, hairlike strokes with a pencil or fine brush and a powder to fill sparse areas; focus on arch and tail for lift.
- Set — use a tinted or clear brow gel to hold hairs in place so they don’t press awkwardly against frames.
- Clean edges — a thin line of concealer under the arch highlights the eyebrow and separates it from the frame visually.
Tips:
- Thicker frames call for slightly bolder brows to avoid being visually overwhelmed.
- For thin frames, slightly softer brows will look elegant rather than competing.
Choose the Right Eyeliner Style
Eyeliner shapes can open the eye, add definition, or lift the eye depending on placement and thickness.
Step-by-step:
- Tightline first — place a thin line at the upper waterline (tightlining) to make lashes appear fuller without visible liner hitting the lens.
- Upper lash line — use a slightly smudged pencil or thin liquid line close to the lashes. Keep liner thinner near the inner corner; slightly thicker toward the outer corner can lift the eye.
- Avoid heavy liner under the eye if your frames cast a shadow there — instead, use a muted shadow along the lower lashline for balance.
- Wing size — small to medium wings work for most frames; large dramatic wings can be cut off by frames and look disjointed.
- Smudge & soften — a tiny brush to soften harsh lines makes them read better behind glass.
Tips:
- If you wear glasses that sit close to the lashes, avoid exaggerated lower liner that can transfer to lenses.
- For magnifying lenses that emphasize eye size, a softer liner may look more natural.
Play With Mascara: Length and Volume Matter

Lashes are essential to avoid your eyes being obscured by frames — but they also must avoid touching lenses.
Step-by-step:
- Curl gently — curl lashes carefully and avoid over-crimps that push lashes into the lens. Heated lash curlers can help set a controlled curl.
- Choose the right formula — a lengthening or volumizing mascara with good hold is ideal so lashes keep shape without drooping onto lenses.
- Apply strategically — focus on the center and outer-upper lashes more than inner lashes (inner lashes are most likely to touch the lens). Wiggle wand at the root then pull through to the tips.
- Layer thin coats — apply 1–2 thin coats, letting each dry slightly to avoid clumping; clumps can smudge on lenses.
- Check for transfer — tilt your head forward (as glasses sit) and ensure lashes clear the lens. If they touch, consider trimming slightly longer outer lashes or switching to a more rigid curl.
Tips:
- If lashes brush lenses, try a waterproof or long-wear formula with firm hold (but remove gently).
- False lashes: pick natural, low-profile strips and trim them so they don’t protrude into the lens area.
Brighten the Inner Corners and Lash Line
Brightening specific small areas adds an illusion of wider, more awake eyes behind frames.
Step-by-step:
- Inner corner highlight — dot a small amount of a light, reflective shade (champagne or soft pearl) on the inner corner with a small brush or fingertip.
- Lower lash light — apply a matte or slightly satiny light shadow to the inner third of the lower lash line to open the eyes.
- Waterline trick — if you want eyes to look larger, a nude or light-beige pencil on the lower waterline (not stark white) creates an awake effect; avoid heavy dark waterlines unless that’s the look you want.
- Subtle shimmer — avoid chunky glitter near inner corners—choose fine pearls to prevent glare on lenses.
Tips:
- Inner corner highlight is a small, high-impact step that really helps eyes show through frames.
Highlight Your Cheekbones

With frames drawing attention to the center of the face, contour and highlight help lift and harmonize the overall look.
Step-by-step:
- Contour lightly — apply a matte contour shade under the cheekbone and blend upward toward the temple to lift the face visually.
- Blush placement — smile and place blush on the apples, then sweep slightly upward along the cheekbone; this lifts the face under frames.
- Highlighter — apply a subtle, finely milled highlighter to the high points (top of cheekbones, brow bone, cupids bow) to reflect light — but keep it soft so reflections don’t catch too much on the lenses.
- Balance with frame color — if frames are bold and colorful, opt for a slightly muted blush and highlight to avoid visual competition; for subtle frames, you can be bolder with luminous products.
Tips:
- Matte bronzer + soft highlighter is more flattering than heavy shimmer when you wear glasses.
Perfect Your Lip Color
Lips anchor the lower half of the face and balance framed eyes.
Step-by-step:
- Decide the focal point — if your eyes are strong, choose a neutral or muted lip; if you want a statement lip, keep eye makeup slightly softer.
- Liner first — lightly define the lip shape with a liner slightly inside your natural line for a precise finish. This helps prevent feathering, which is especially visible behind frames.
- Finish choice — satin or cream finishes are universally flattering; glossy finishes can compete with reflective lenses, so use gloss sparingly or only on the center of the lip.
- Color temperature — warm frames often pair well with warmer lip tones; cool frames with pinks/berries — but personal style always overrides “rules.”
Tips:
- Long-wear formulas minimize transfer and keep your look tidy under and around frames.
Avoid Common Makeup Mistakes for Glasses Wearers
Common missteps — and how to fix them:
- Heavy lower-liner → can create a shadow or smudge on lenses. Fix: soften with shadow or use a thin line only at outer third.
- Too much shimmer on lids → reflects into lenses and creates glare. Fix: opt for satin finishes or very fine pearl.
- Powdery under-eyes that cake → visible under frames. Fix: use minimal, finely milled powder and set with a delicate hand.
- Over-drawn brows that compete with frames → look unnatural. Fix: soften with a spoolie and use hair-like strokes.
- Lash length that touches lenses → smudges and discomfort. Fix: trim or choose mascaras that give controlled curl, or adjust curl technique.
General rule: think about how makeup will look framed and scaled — you want balance, not competition.
Step-by-Step Makeup Routine for Glasses Wearers

One complete, easy routine you can follow from AM to finish (approximate times included):
Prep (2–3 minutes)
- Cleanse and moisturize.
- Primer: light layer all over (silicone or hydrating depending on skin).
Base (3–5 minutes)
3. Apply foundation sparingly; blend with a damp sponge.
4. Color correct dark circles lightly if needed.
5. Apply concealer in triangular shape under eyes; blend.
6. Lightly set only T-zone and under-eye with finely milled powder.
Brows (2 minutes)
7. Fill brows with short strokes; set with gel.
Eyes (6–10 minutes)
8. Prime lids.
9. Sweep transition shade into crease.
10. Apply light satin shade on lid.
11. Deeper shade on outer V and blend.
12. Tightline upper waterline.
13. Thin upper lash line liner; slight lift at outer corner.
14. Curl lashes and apply 1–2 thin coats mascara — focus on upper lashes center & outer.
Brighten (1 minute)
15. Dot inner corner highlight.
16. Light nude pencil on lower waterline if desired.
Cheeks (2 minutes)
17. Apply blush on apples, sweep upward.
18. Light contour under cheekbones if desired.
19. Soft highlighter on top of cheekbones (small amount).
Lips (2 minutes)
20. Define with liner and fill with chosen lipstick / tint.
21. Add center gloss only if desired (helps avoid reflections).
Finish (30 seconds)
22. Spritz setting spray to meld makeup.
Total: ~20–25 minutes (can be shorter with practice).
Final Words
Glasses change the visual map of your face — but they don’t limit your makeup creativity. By starting with a polished base, emphasizing brows and eyes in the right ways, controlling mascara and liner, and balancing cheek and lip color, your frames will enhance rather than hide your features. The best makeup rule? Try these techniques, adapt them to your frame shape and prescription effects, and most importantly—wear what makes you feel confident. Glasses are an accessory that frames your personality; your makeup is the finishing touch that makes the whole look sing.


