Eyeliner can transform your whole look — subtly or dramatically — but the same line doesn’t flatter every eye. When you match technique to your natural eye shape, eyeliner enhances your best features, makes your eyes look bigger/longer/brighter, and lasts without smudging. This guide teaches you how to identify your eye shape, explains universal rules, walks through the best tools, and gives step-by-step eyeliner looks for every common eye type — plus fixes for mistakes and long-wear tricks. Read the intro, then skip to the sections for your eye shape.
Why Your Eye Shape Matters for Perfect Eyeliner
Your eye shape changes how a line looks because eyeliner interacts with:
- the lid space available (how much mobile lid you have),
- the crease and brow bone position,
- the tilt of the outer corner (upturned vs downturned), and
- how visible your lash line is when your eyes are open.
A line that’s perfectly balanced on almond eyes might close off small or round eyes, or disappear on hooded lids. Matching line thickness, placement, and wing angle to bone structure and lid shape creates illusion — length, lift, or symmetry — instead of adding harshness or shrinking the eye.
How to Identify Your Natural Eye Shape
Stand in natural light, relax your face, and look straight ahead into a mirror. Use a clean Q-tip to trace the visible lid shape if helpful.
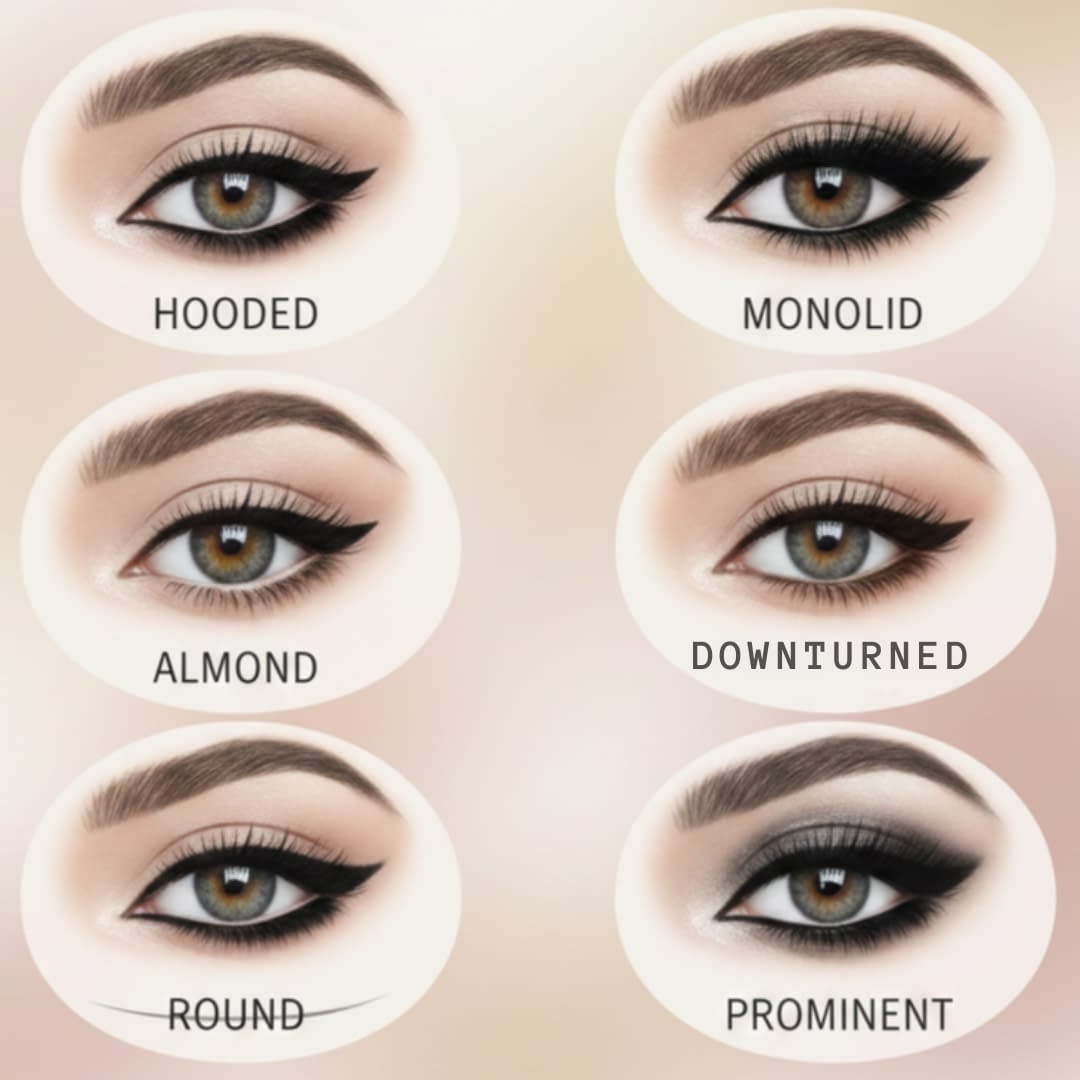
Common shapes and quick ID clues:
- Almond: Visible crease, lid tapers slightly at both inner and outer corners; looks like an almond silhouette.
- Round: Wide open appearance, more visible white above and below the iris — outer corners often show more lid.
- Hooded: Heavy skin folding over the crease when eyes are open; little mobile lid visible.
- Monolid: Little to no crease; lid appears flat from lash line to brow bone.
- Downturned: Outer corner angles slightly down relative to inner corner.
- Upturned: Outer corner angles up; lower lash line curves upward.
- Deep-set: Eye socket is set back; more shadow on the brow bone, and lids may appear recessed.
- Close-set: Inner corners close to each other; less space between eyes.
- Wide-set: Noticeable distance between inner corners; more space on the inner lid.
If your eyes are a mix (e.g., one hooded, one almond), apply asymmetric techniques and adjust for the more challenging eye.
General Eyeliner Rules Everyone Should Know
- Start thin at the inner corner and build outward. A thin inner line opens the eye; thickening only toward the outer half elongates.
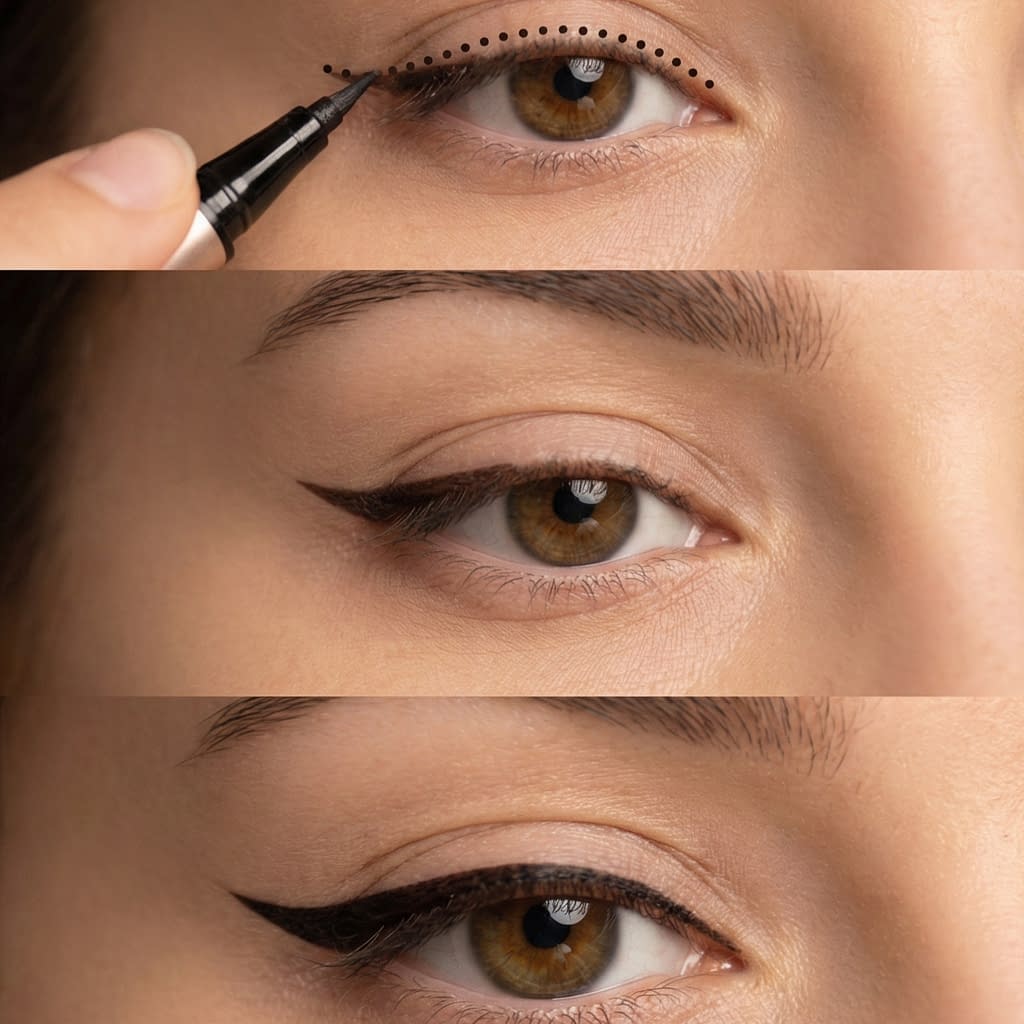
- Small strokes > one long line. Short, connected strokes or dots let you control shape and correct easily.
- Tightline to add fullness without weight. Upper waterline tightlining makes lashes look denser while keeping the lid visually open.
- Think light to heavy: apply a pencil or gel first, then sharpen and set with powder/eyeshadow for longer wear.
- Match wing angle to lower lash line. Follow the natural lash line extension (toward the tail of the brow) for flattering wings.
- Use matte or satin liners for daytime. Shimmer can close small eyes; reserve metallics for center lid or inner corner.
- Less is more on lower lid. Heavy lower liner closes eyes; instead, smudge a soft color on the outer third or use a nude/peach waterline to open.
- Layer for longevity: pencil → gel → set with matching shadow → topcoat of waterproof mascara helps hold shape.
Best Eyeliner Types and Tools for Beginners
- Pencil liners (creamy): forgiving, easy for small strokes and smudging. Best for beginners.
- Retractable/gel pencils: smoother application but check quality (some drag).
- Gel liner + angled brush: excellent mid-skill choice — creates precise lines and flexible thickness.
- Liquid liner (felt or brush): sharpest wings and crisp lines — steeper learning curve but best for graphic looks.
- Cream pots: use an angled brush for control; a great balance of precision and ease.
- Smudge brush & small detail brush: for softening and refining.
- Cotton swabs + makeup remover: essential for quick corrections.
Beginner kit: soft black/brown pencil, small angled brush, and a gel pot or pencil in black/brown. Practice thin lines first and build.
Eyeliner for Almond Eyes: Enhance Your Natural Shape
Almond eyes are versatile — most liner styles flatter them. The goal is to accentuate the natural taper and slight lift.
Step-by-step: Classic Almond Wing
- Prep: curl lashes and apply thin mascara base. Prime lids if oily.
- Tightline: use a soft pencil to tightline upper waterline for instant lash density.
- Thin base line: draw tiny dashes along the upper lash line from the inner corner, building to the outer two-thirds. Connect and smooth with small strokes.
- Wing placement: imagine a line from the outer corner toward the tail of the brow — draw a small flick (length depends on preference).
- Connect wing: draw a thin line from the wing back to the mid-lash line, filling the triangle. Keep the inner third very thin.
- Balance lower lash line: softly smoke the outer third with a small amount of shadow; leave inner lower waterline nude or slightly highlighted.
- Finish: sharpen edges with a clean, dampened small brush dipped in concealer if needed.
Variations: for a softer day look, use brown and smudge out with a brush; for glam, thicken the outer third and add a tiny center-lid shimmer.
Eyeliner for Round Eyes: Create Length and Definition
Round eyes benefit from elongation — the goal is horizontal extension and a lifted outer corner.
Step-by-step: Elongating Round Eyes
- Prep: curl lashes and apply base mascara.
- Thin inner line: start extremely thin at the inner corner to avoid closing the eye.
- Extend outer line: lengthen your line past the outer corner by 3–6 mm (adjust to taste) — this immediately elongates.
- Slight upward flick: angle the wing slightly upward to counteract roundness and add lift.
- Smudge outer third: gently smudge the outer 1/3 on the lower lash line with shadow to blend and create continuity.
- Avoid heavy lower rim: do not line the entire lower waterline with dark liner; instead use a soft nude/peach pencil for inner waterline to open the eye.
- Optional: add a tiny point of highlight at inner corner for contrast.
Tip: keep the center of lid lighter to visually push it forward, reinforcing an elongated silhouette.
Eyeliner for Hooded Eyes: Tricks to Make Your Eyes Pop
Hooded lids hide the crease and can make harsh liner disappear when eyes are open. The trick: keep liner visible when eyes are open — create thin lines and fake a higher crease/wing.
Step-by-step: Hooded-Friendly Liner
- Open-eye check: look straight into a mirror and mark (very lightly) where the lash line looks visible when your eyes are open. Use that as your guide.
- Thin root-based line: apply a very thin line along the upper lash line, tight to lashes. Build small.
- Create an outer wing above the hood: draw the wing with the outer corner as the pivot, but start the wing slightly higher than where you’d normally place it — this creates visible lift when eyes are open.
- Avoid thick inner lines: heavy inner liner will disappear under the hood.
- Use a small angled brush & gel: precision is key — use gel or cream to control thickness.
- Open the center: keep the center of the lid clean or add a tiny light matte/ satin shade to reflect light.
- Tightline for fullness — it defines lashes without adding weight to the lid.
- For dramatic looks: use a floating liner (a thin line slightly above the natural lash line) or baby wing to be visible above the hood.
Pro tip: hooded eyes often benefit from waterproof products that won’t transfer into the hood throughout the day.
Eyeliner for Monolid Eyes: Build Shape and Depth
Monolids have little to no crease, so liner can be used to build shape and provide a gradient effect. Smudging and thick lines near the lash base work well.
Step-by-step: Monolid Shape Builder
- Tightline well: this creates a dense base of lashes and helps the liner read even when the lid is flat.
- Start medium-thin at inner corner: build thickness gradually toward the outer corner. Monolids can carry a bolder line near the outer half.
- Smudge/soften: use a pencil or gel and then smudge upward slightly into the lid area to create depth (a small brush or smudge tool).
- Wing for extension: make the wing slightly longer and flatter (less vertical) to elongate the eye.
- Gradient technique: apply a darker liner close to lashes and blend a softer shadow above it to create dimension.
- Consider a subtle center highlight (tiny shimmer) if you want the eye to catch light when open.
For bold looks, graphic thicker liner across the lid works beautifully on monolids — it becomes the-eye-defining element.
Eyeliner for Downturned Eyes: Subtle Lifting Technique
Downturned eyes can appear sad or tired if the outer corner is emphasized downward. The liner should lift and neutralize the downward tilt.
Step-by-step: Lifting Liner
- Tightline to create lash density.
- Thin inner line — build outward.
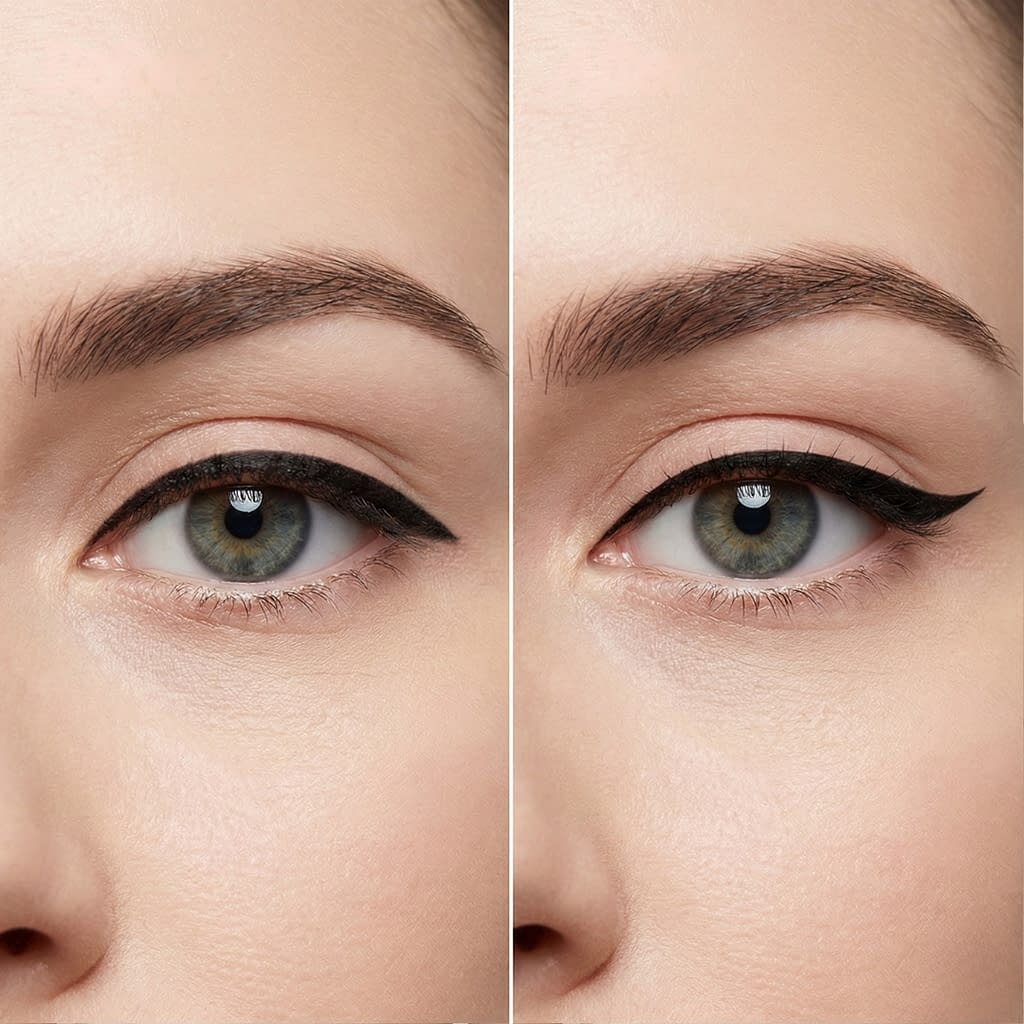
- Create a lifted wing: draw a small upward flick from the outer corner (follow lower lash line and lift slightly) — the flick should counteract the down angle.
- Avoid heavy lower liner on outer third — instead, softly smudge a shadow upward at the outer lower lash line to create lift.
- Optional kitten-liner: a gently curved inner-to-outer flick that rises subtly is very flattering.
- Open the inner eye with a light liner on the lower waterline or inner corner highlight to draw focus away from the downturned corner.
Small wings work best; overtly long wings can look harsh. Use brown for softer daytime lift.
Eyeliner for Upturned Eyes: Balance and Soft Definition
Upturned eyes are naturally lifted; the goal is balance and to avoid over-lifting which can look overly cat-eye.
Step-by-step: Soft definition for Upturned Eyes
- Tightline to densify the lash line.
- Thin-to-medium base line: keep inner third thin, outer third slightly thicker — follow natural shape.
- Shorten the wing — if you use one, keep it softer and more horizontal (not sharply up). This preserves the natural balance.
- Define lower outer third with a soft shadow to anchor the shape and prevent the eye from looking too lifted.
- Soften edges with a smudge brush for a modern, lived-in look.
Upturned eyes can carry bold liner looks well, but balancing depth on the lower outer lid prevents an exaggerated cat appearance.
Eyeliner for Deep-Set Eyes: Brightening and Softening Tips
Deep-set eyes sit back in the socket; heavy liners can make them disappear. The aim is to brighten the lid and avoid too much shadow on the brow bone.
Step-by-step: Deep-set Eye Liner
- Use lighter shades on the lid to bring it forward; reserve dark liners for the lash line only.
- Thin upper liner: tightline and apply a thin line on the upper lash line — avoid thick block liner that eats the lid.
- Emphasize lower lash line gently: smoked outer lower lash line can add perceived forwardness when blended, but don’t overdo.
- Highlight the inner corner and center lid with a subtle sheen to bring the lid forward.
- Avoid heavy crease work that adds further recession.
- Use warm brown liners for softer definition rather than stark black.
If you want drama, create definition with lashes (lengthening mascara or individual lashes focused on outer half) rather than very thick liner.
Eyeliner for Close-Set Eyes: Create the Illusion of Space
For close-set eyes, the trick is to open the inner corner and move visual weight outward.
Step-by-step: Spacing Illusion Liner
- Skip inner waterline black: use nude or white on the inner waterline to create space.
- Start liner a few millimeters from inner corner — avoid heavy inner liner.
- Build thickness toward the outer half — concentrate liner on the outer two-thirds to pull the eye outward.
- Extend the wing outward (not steeply upward) to add horizontal distance.
- Smudge outer lower lash line slightly to balance and add the illusion of width.
- Highlight inner corner for extra separation.
This outward emphasis makes eyes read further apart without seeming unnatural.
Eyeliner for Wide-Set Eyes: Bring Your Look Together
Wide-set eyes benefit from adding visual weight to the inner portion to draw them closer together.
Step-by-step: Bringing Wide-Set Eyes Inward
- Tightline and start liner at inner corner — a thin inner line adds central focus.
- Keep inner third defined and gradually thin toward the center.
- Add a subtle shadow or pencil on the inner lower lash line to anchor the inner eye.
- Avoid very long wings that will accentuate width; keep wings moderate and balanced.
- Use inner corner highlight moderately (too much sparkle spreads the visual field).
By centralizing some depth, the eyes feel more proportionate with the face.
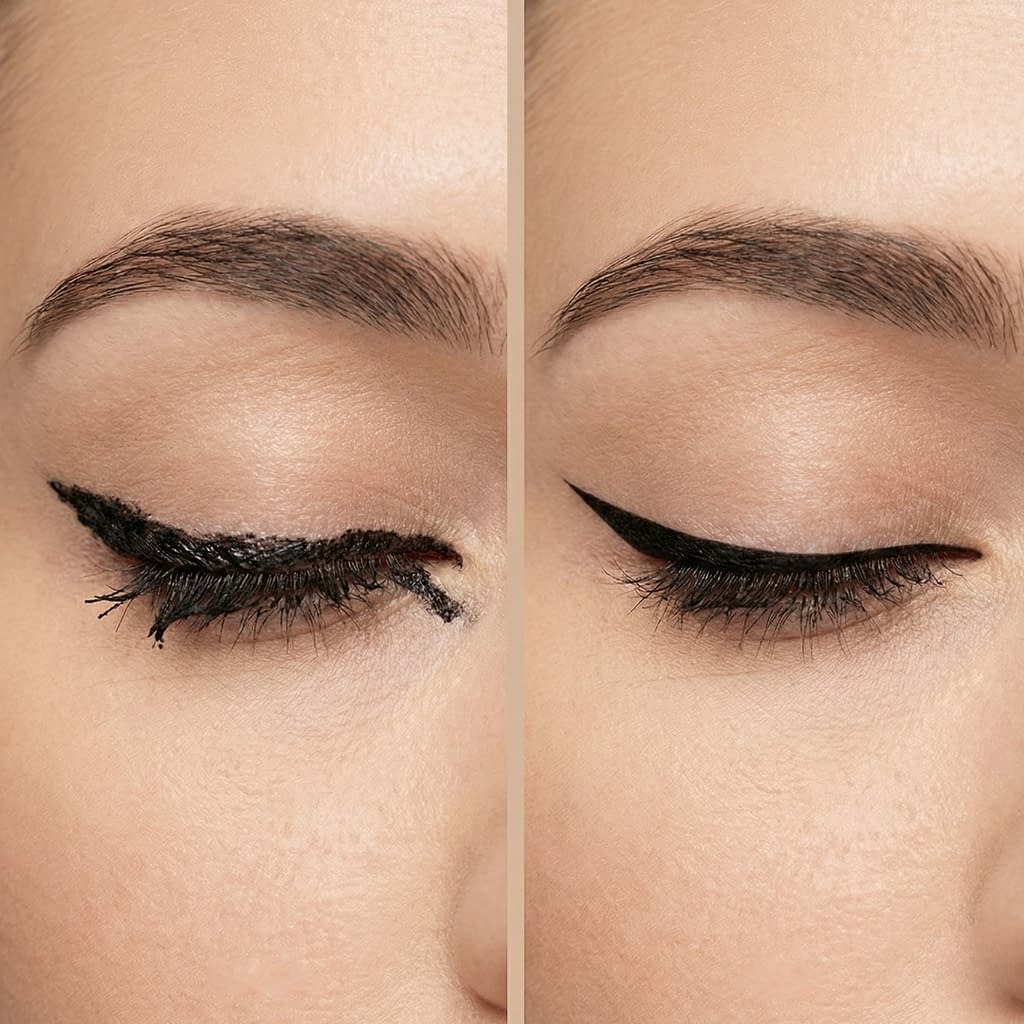
Common Eyeliner Mistakes and How to Fix Them
Mistake -> Fix
- Thick inner-to-outer line that closes the eye → thin inner line, concentrate thickness on outer half.
- Uneven wings → use small dots to mark wing start and end, connect, then clean with a cotton bud dipped in makeup remover.
- Jagged liquid lines → use tiny strokes and rest your elbow on a surface; clean up edges with concealer on a fine brush.
- Smudged lower liner → set with matching shadow and use a thin smear instead of an intense waterline.
- Liner transferring to the lid (hooded eyes) → use waterproof formulas, set with matching powder shadow, and keep liner very close to lashes.
- Overdrawn wing that looks fake → shorten wing and blend the outer edge slightly with shadow for a softer finish.
When in doubt, step back, photograph in natural light, and refine.
Extra Tips for Smudge-Proof, Long-Lasting Eyeliner
- Prime the lid (eye primer or thin concealer) for oily lids.
- Layer textures: pencil base → gel/liquid for crispness → set with powder or matching eyeshadow.
- Use waterproof formulas for tightline and waterline, but remove with oil cleanser at night.
- Set with translucent powder if you have very oily lids (light dusting before liner).
- Avoid touching eyes throughout the day — set a quick rule to keep hands away.
- Seal with setting spray after makeup to melt layers together and lock liner.
- Carry a cotton bud + concealer for emergency cleanups to sharpen edges.
Final Words
Eyeliner is a small tool with huge impact when tailored to your natural eye shape. Start with the general rules, pick the tools you love, and practice the step-by-step technique for your eye type. Work slowly — thin inner lines, build outward, and adjust wing angle to your bone structure. Most looks are rescued by small fixes (smudge, sharpen, set), and the best liner is the one that makes your eyes feel like you — only more awake, lifted, and defined.


