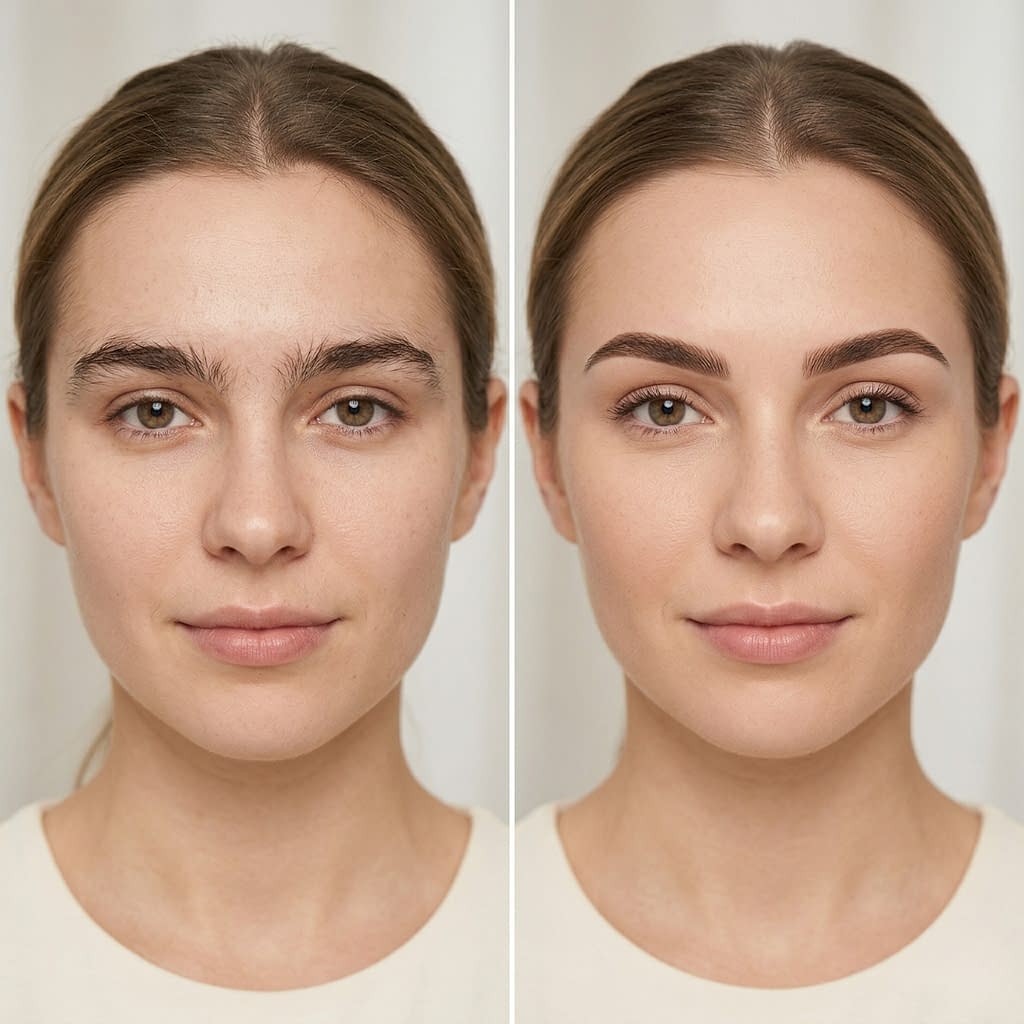
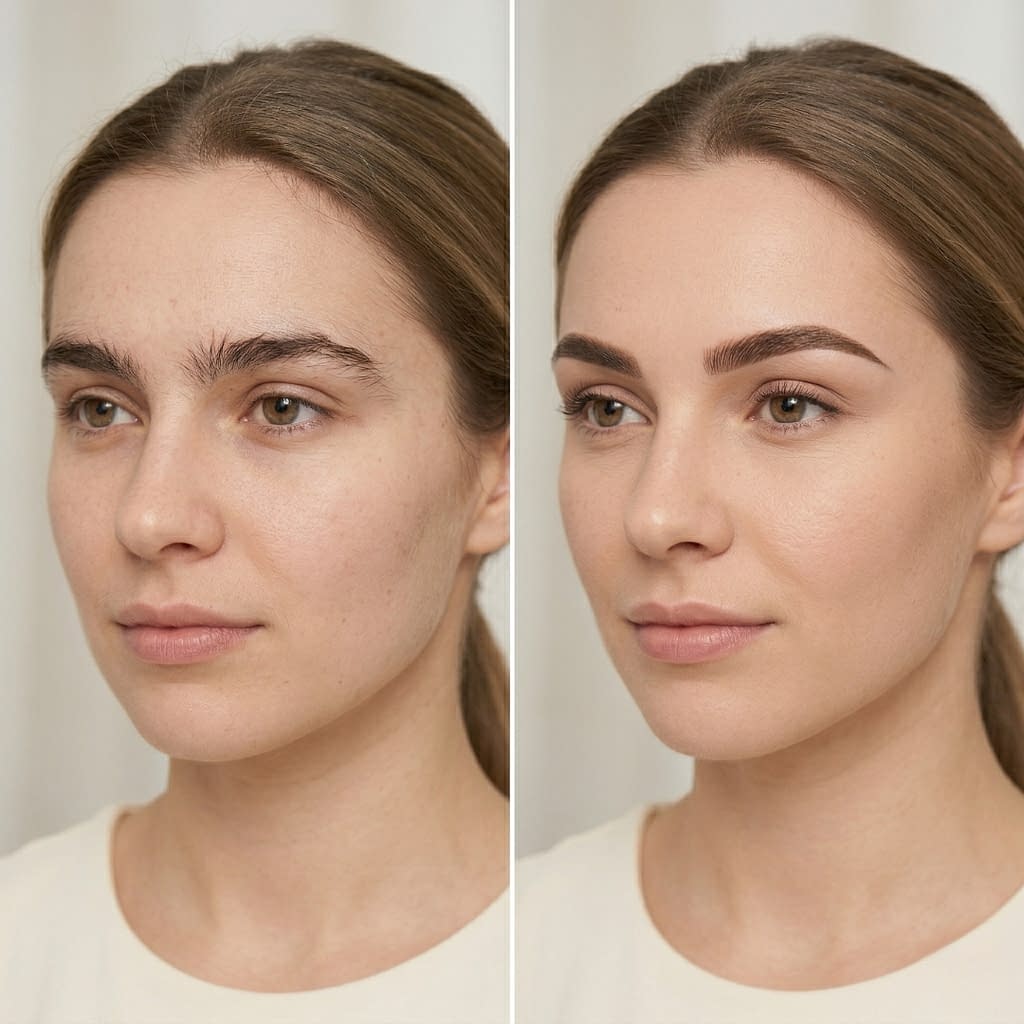
Well-shaped eyebrows can completely change the way your face looks. They frame your eyes, balance your features, and can make your face look more polished even when you are not wearing much makeup. That is why eyebrow plucking is such a useful beauty skill. When done correctly, it helps you clean up stray hairs, enhance your natural shape, and create brows that look neat without looking overdone.
The tricky part is that eyebrows are easy to overwork. One too many hairs removed from the wrong spot can throw off the balance of your face, and trying to force brows into a shape that does not match your natural growth can make them look harsh or uneven. The best brow shaping always starts with patience, a light hand, and a clear understanding of your own features.
In this guide, you will learn how to pluck your eyebrows safely and carefully, how to find the most flattering shape for your face, how to avoid common mistakes, and how to calm your skin afterward. Each section breaks the process into simple steps so you can shape your brows with more confidence and less guesswork.
Why Eyebrow Shape Makes Such a Big Difference
Eyebrows do a lot more than you might think. They can make your eyes appear larger, soften strong features, lift the face visually, and create more symmetry. Even a small change in brow shape can dramatically change your expression.
Brows also affect how balanced your features look. Thick, straight brows can give a stronger appearance, while softly arched brows may make the face look more lifted. Thin or highly arched brows can create a different mood altogether. That is why eyebrow shaping is one of the most impactful parts of grooming and makeup.
Step by step: why brows matter so much
- Brows frame the eyes and define the upper face.
- Their shape influences how balanced your features look.
- They can soften, sharpen, lift, or widen the appearance of the face.
- Small changes in brow shape affect the overall expression.
- Clean brows often make the whole face look more polished.
When your brows suit your face, everything else tends to look more harmonious.
Understanding Your Natural Brow Shape
Before you pluck anything, it is important to understand what your natural brows already do well. Your natural brow shape is the best starting point because it follows the way your hairs grow and supports the structure of your face.
Some people naturally have straighter brows, while others have more arch or a slightly rounded shape. Your goal is not to erase that shape, but to refine it. The more you work with your natural brow structure, the more likely the result will look flattering and believable.
Step by step: how to study your natural brows
- Clean your face so you can see your brows clearly.
- Brush your brow hairs upward with a spoolie.
- Notice where the brow starts, arches, and ends.
- Look for your natural thickness and direction of growth.
- Identify stray hairs that fall outside your ideal shape.
A good brow shape usually enhances what is already there instead of fighting against it.
Tools You Need for Safe and Precise Brow Plucking

Having the right tools makes brow plucking much safer and easier. A clean, sharp set of tweezers is the most important tool, but a few other items can help you get better results and reduce irritation.
Helpful tools
- Slanted tweezers for precise hair removal
- Spoolie brush for shaping and checking the brow
- Small mirror
- Good lighting
- Gentle cleanser or toner
- Ice pack or cold compress for aftercare
Step by step: prepare your tools
- Wash or sanitize your tweezers before use.
- Make sure the tips close evenly.
- Use a bright mirror so you can see each hair clearly.
- Keep a spoolie nearby to brush brows between plucks.
- Have a soothing product ready for afterward.
Good tools help you remove only the hairs you truly want gone.
How to Prep Your Brows and Skin Before Plucking
Proper prep makes plucking easier, less painful, and more accurate. Trying to pluck dry, irritated skin or working in poor lighting often leads to mistakes.
Step by step: prep routine
- Wash your face with a gentle cleanser.
- Pat the skin dry.
- Soften the area with a warm cloth for a minute or two if desired.
- Brush the brow hairs upward and outward.
- Decide which hairs are truly outside the shape you want.
Helpful tips
- Plucking after a shower can help because hair and skin are softer
- Do not apply heavy creams before plucking because tweezers may slip
- Work in natural or bright lighting if possible
A little prep goes a long way toward cleaner, more comfortable shaping.
Finding the Right Brow Shape for Your Face

The best brow shape is one that complements your face rather than copying a trend exactly. Different face shapes often look best with slightly different brow styles.
General guidance
- Round faces often suit a brow with a gentle arch
- Square faces often look balanced with a soft arch and slightly fuller shape
- Oval faces usually work well with many brow shapes
- Heart-shaped faces often benefit from a softer, more rounded brow
- Long faces may look better with a flatter brow shape
Step by step: how to choose your shape
- Identify your face shape in a mirror.
- Study your natural brow growth.
- Choose a shape that balances your features.
- Keep the brow head, arch, and tail in proportion.
- Avoid shaping so much that the brow looks disconnected from your face.
The right brow should feel like it belongs there naturally.
Step-by-Step Guide to Plucking Your Eyebrows
This is the core of the process. The best approach is slow, controlled, and symmetrical.
Step by step plucking process
- Brush the brow hairs upward with a spoolie.
- Look for hairs that fall clearly outside your desired shape.
- Pluck one hair at a time.
- Pull the skin slightly taut if needed.
- Remove the hair in the direction of growth.
- Pause often to check symmetry.
Best technique
- Start under the brow first, since this area usually defines the shape
- Leave the top edge alone unless there are obvious stray hairs
- Pluck from the inner brow outward, but do not overdo the center
- Stop frequently and step back from the mirror
A simple rule to follow
Remove less than you think you need. You can always pluck one more hair later, but you cannot put one back quickly.
How to Avoid Over-Plucking and Uneven Brows
Over-plucking is one of the biggest brow mistakes. It can make the brows look thin, patchy, or mismatched, and it may take weeks to grow back evenly.
Step by step: avoid over-plucking
- Pluck only obvious stray hairs first.
- Check both brows in the mirror before removing more.
- Take breaks so you do not keep plucking out of habit.
- Use a spoolie to see the brow shape more clearly.
- Stop as soon as the brows look clean and balanced.
Helpful tips
- Do not chase perfect symmetry hair by hair
- Brows are sisters, not twins
- Stop before the shape becomes too narrow
A slightly fuller brow is usually more flattering than one that has been over-cleaned.
Tips for Plucking Sensitive Skin Without Irritation

Some skin reacts strongly to plucking, especially around the brows where the area is delicate. If you have sensitive skin, gentleness is essential.
Step by step: reduce irritation
- Clean the area before starting.
- Use sharp tweezers so each hair comes out cleanly.
- Pluck slowly instead of rushing.
- Apply a cold compress after plucking.
- Avoid heavy skincare or makeup right away.
Extra tips
- Avoid plucking right before going out in the sun
- Do not pluck broken or inflamed skin
- If the area is very sensitive, try plucking after a warm shower
Sensitive skin benefits from a calm, minimal approach.
How to Fix Mistakes While Plucking Brows
Even careful plucking can sometimes go wrong. The good news is that most mistakes can be managed while the brows grow back.
If you remove too much
- Stop plucking immediately.
- Brush the brows and step back from the mirror.
- Fill in sparse areas lightly with brow makeup if needed.
- Avoid trying to “even it out” by over-plucking the other brow.
- Let the hairs grow back naturally.
If the brows look uneven
- Check whether the issue is real or just caused by expression or lighting.
- Use a brow pencil or powder to balance the shape temporarily.
- Wait a few days before making more changes.
- Trim or clean only obvious stray hairs later.
The key is not to panic and make the mistake worse.
Aftercare Tips to Calm Redness and Swelling
Aftercare helps the skin recover and keeps the area comfortable.
Step by step aftercare
- Wipe the area gently with a clean, soothing product if needed.
- Apply a cold compress or chilled spoon wrapped in cloth.
- Use a fragrance-free calming moisturizer if your skin tolerates it.
- Avoid touching or rubbing the area.
- Skip harsh exfoliants or active ingredients around the brows for a while.
Helpful tips
- Redness usually fades quickly
- Keep the area clean to avoid irritation
- Do not apply heavy makeup immediately if the skin feels tender
A little care after plucking keeps the skin calm and helps the brows look better.
How Often You Should Pluck Your Eyebrows
How often you pluck depends on how fast your hair grows and how full you like your brows to look. There is no single schedule that works for everyone.
General guidance
- Some people pluck weekly
- Others only need to clean up every two to four weeks
- If your brows grow slowly, you may need even less maintenance
Step by step: find your schedule
- Notice when stray hairs begin to affect the shape.
- Clean up only when necessary.
- Avoid plucking every day, which can lead to over-thinning.
- Keep the main shape intact.
- Maintain, do not constantly reshape.
Regular but minimal maintenance keeps brows looking neat without overworking them.
Common Eyebrow Plucking Mistakes to Avoid
There are a few classic mistakes that can make brow shaping much harder than it needs to be.
Mistakes to avoid
- Plucking too much from the top of the brow
- Removing hairs without checking symmetry
- Using dull tweezers
- Plucking in bad lighting
- Trying to force a trend shape that does not suit your face
- Tweezing too close to the brow line and thinning the shape too much
Step by step: avoid these mistakes
- Work slowly and in good light.
- Use sharp tools.
- Follow your natural brow structure.
- Take breaks and reassess.
- Stop once the brows look clean, not overdone.
A few smart habits can save your brows from months of regret.
Final Words
Plucking your eyebrows for the perfect shape does not have to be complicated. The best results usually come from working with your natural brows, using the right tools, and removing only the hairs that truly interrupt the shape you want. When you take your time, the process becomes much safer, more comfortable, and far more flattering.
The most important thing to remember is that brows do not need to be perfect to look beautiful. They just need to suit your face and feel balanced. A little cleanup can make a big difference, but over-plucking can create problems that take much longer to fix. That is why patience and restraint matter so much.
If you follow the steps in this guide, your brows can look cleaner, softer, and more defined while still keeping their natural character. The perfect brow shape is not about removing everything. It is about refining just enough to let your features shine.


