
If your ends have that dry, brittle, straw-like feel after months of straightening, curling, or high-heat blow-drying, you’re not alone — and you don’t always need a dramatic chop to improve the look. Heat damage primarily weakens the hair shaft and roughens the cuticle, which makes the ends look frizzy, feel rough, and break. With the right combination of protective habits, reparative products, targeted treatments, and patience, you can dramatically improve how your ends look and behave — and delay a big cut until you’re ready.
Below you’ll find a full, practical plan: how to quickly stop more damage, how to treat and temporarily disguise damaged ends, what home treatments actually help, how often to use protein vs. moisture, and when a salon treatment or a small dusting is the smarter option. Everything is safe, step-by-step, and written so you can start doing it today.
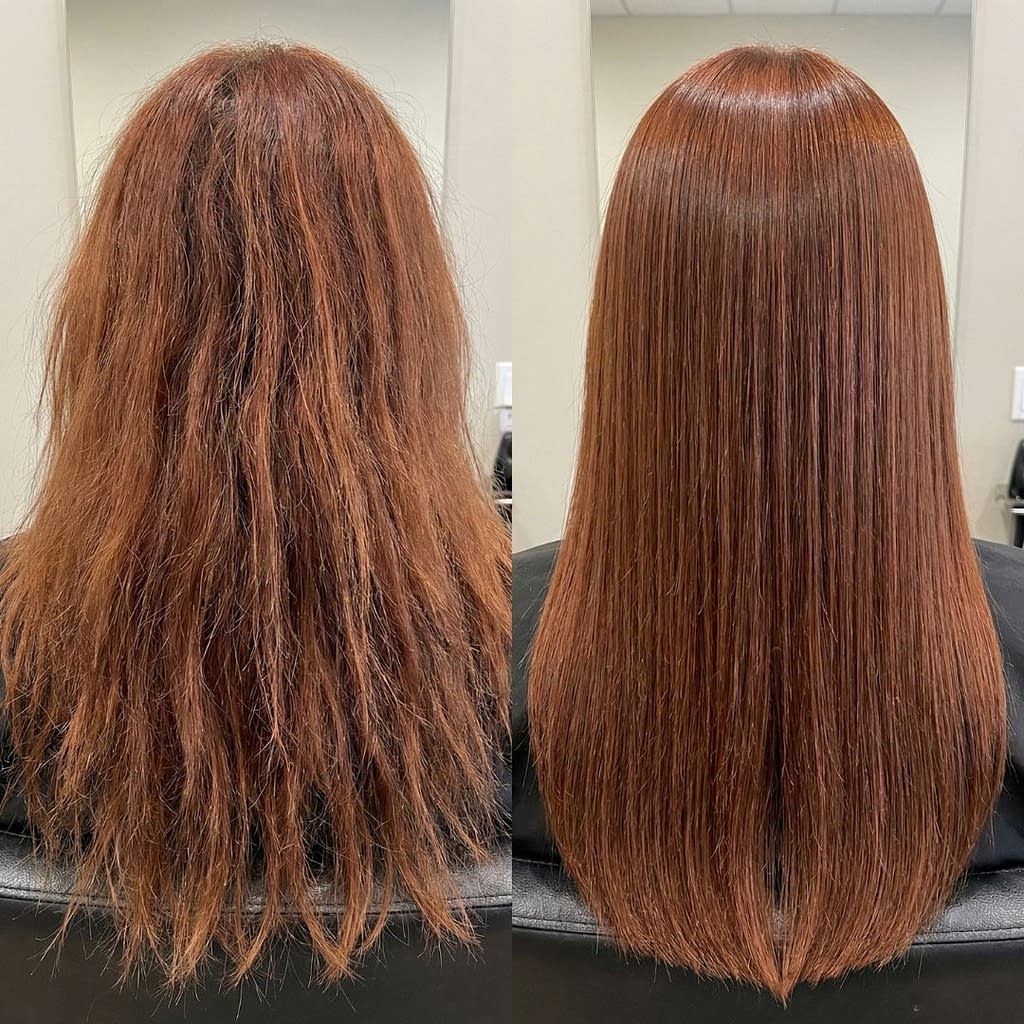
What Heat Damage Looks Like and Why Ends Suffer Most
Heat damage shows up in a few clear ways:
- Ends feel dry, rough, and straw-like to the touch.
- Hair looks dull and lacks natural shine.
- You see split ends, frizz, and irregular breakage rather than clean breaks.
- The shape of the hair shaft may feel limp or brittle and it tangles easily.
Why ends suffer most:
- The ends are the oldest part of the hair shaft and have been exposed to the most physical and chemical stress.
- Heat opens the cuticle (the outer protective scales), and repeated heat without proper protection permanently weakens the cortex (interior structure).
- Once the cortex is damaged, the hair loses elasticity and is more likely to break instead of bend.
Knowing these signs helps you choose treatments that focus on sealing, fortifying, and preventing further breakage.
Understand the Difference: Heat Damage vs. Split Ends
It’s useful to distinguish the two because they need different approaches.
- Heat damage is a structural weakening of the hair caused by repeated exposure to high temperatures. It can make the entire shaft brittle and uneven. Often the hair looks dull and feels crunchy or gummy (if badly cooked).
- Split ends are when a single strand splits into two or more strands at the tip. Split ends are a surface symptom — they’re visible and usually need to be trimmed (or dusted) to stop the split from traveling up the hair.
If your hair is heat-damaged but largely intact, you can rehabilitate most of the shaft’s appearance. If you have many visible split ends, trimming or dusting will produce the most immediate improvement.
Stop Further Damage: Immediate Do’s and Don’ts

Do these right away.
Do
- Stop heat styling or reduce it drastically. Give hair at least 2–4 weeks of heat-free time if possible.
- Use a heat protectant (if you must use heat) and use the lowest effective setting.
- Switch to gentle cleansing (sulfate-free) to avoid stripping moisture.
- Use leave-in conditioners and light oils to smooth and protect ends.
- Sleep on satin or silk to reduce friction.
Don’t
- Don’t keep increasing temperature to “fix” frizz — higher heat usually worsens damage.
- Don’t brush aggressively when hair is wet — use a wide-tooth comb or detangling brush and detangle from ends up.
- Don’t do harsh chemical services (bleach, perms) while attempting to repair; wait until hair is stronger.
- Don’t use high-alcohol styling sprays that dry hair out.
Immediate behavior changes reduce further damage and let products start working.
Trim Smartly: When a Dusting Beats a Chop
If ends are frayed but you want to keep length, a dusting (micro-trim) is a great first step.
Step-by-step dusting at the salon (recommended)
- Ask your stylist for a dusting or split-end trim — just a small trim of the very tips, removing only the split or weakened fibers.
- The stylist will twist or rub sections to expose split strands and snip them away while preserving length.
- Dusting can instantly reduce visible frizz and make hair look healthier without a major length loss.
When to choose a bigger chop
- If hair is severely heat-treated through the mid-lengths (mushy, gummy, or thin), a fuller trim will deliver the healthiest result. Sometimes trading a few inches for strong, healthy ends is worth it.
If you can’t visit a stylist, a small at-home snip of the very ends can help — but be conservative.
Gentle Cleansing: Shampoos That Won’t Strip Fragile Ends

Cleansing strategy: be gentle and selective.
What to look for
- Sulfate-free surfactants (milder detergents) rather than SLS/SLES as your primary cleanser.
- Humectants like glycerin or panthenol to pull moisture into the shaft.
- Lower pH formulas (slightly acidic) help flatten the cuticle after washing.
- Protein or lipid-rich conditioners to strengthen ends after washing.
How to wash (step-by-step)
- Wet hair with lukewarm water — avoid very hot water.
- Apply a small amount of gentle shampoo to the scalp; massage lightly — let the suds rinse through the lengths rather than scrubbing the ends directly.
- Rinse, then apply a generous conditioner focused on mid-lengths and ends.
- Use a cool rinse at the very end to help close the cuticle.
- Pat dry with a microfiber towel or old T-shirt — don’t rub.
Frequency: if hair is dry and fragile, extend time between washes and use dry shampoo on the roots if needed.
Deep Conditioning and Protein Treatments — When and How to Use Them
Damaged hair needs both moisture and strength — but in the right balance.
Protein treatments restore strength by temporarily filling gaps in the hair’s structure. Moisture (conditioning) restores flexibility and smooths the cuticle.
How to use them safely (step-by-step)
- Assess porosity and damage: if hair is very limp and mushy, start with moisturizing treatments. If it’s dry and snaps, a light protein boost can help.
- Start with a deep conditioning mask (moisture) once a week for 4–6 weeks. Leave for 10–30 minutes under a shower cap or gentle warmth to help penetration.
- Introduce a protein treatment every 3–6 weeks (depending on product and damage) — use a small amount and follow instructions. Over-proteinizing makes hair brittle; if hair becomes stiff, increase moisturizing sessions and reduce protein.
- Alternate moisturizers and proteins — e.g., moisture mask week 1, light protein treatment week 3, maintenance conditioner in between.
- Rinse thoroughly and finish with a leave-in conditioner or light oil.
Start conservatively. If unsure, choose a product labeled for damaged or color-treated hair and follow the frequency guidance.
Bond-Building Home Treatments to Strengthen Hair Fibers
Bond-builders are a big help — they reconnect weakened chemical bonds inside the hair shaft.
How to use at home (step-by-step)
- Choose a reputable bond-building at-home kit made for bond repair (follow product instructions carefully).
- Use exactly as directed — most require applying to damp hair, leaving for a set time, then rinsing and following with conditioner.
- Frequency: many at-home bond products are safe to use every 2–4 weeks depending on the formula; check the label.
- Don’t mix a bond builder with strong acids or other aggressive treatments the same day.
- Follow with moisturizing mask to restore softness.
Note: professional in-salon bond treatments are stronger and often more effective, but at-home options can still improve the feel and resilience of damaged ends.
DIY Masks and Oils That Nourish and Temporarily Smooth Ends
DIY helps, but choose wisely and use as a complement to salon products.
Simple, effective DIY ideas
- Avocado + olive oil mask: mash half an avocado with 1 tbsp olive oil; apply to ends for 20–30 minutes; shampoo and condition. Good for moisture and shine.
- Coconut oil pre-wash treatment: apply a thin layer to the ends 30–60 minutes before washing (or overnight for very dry hair) — rinse and condition as usual. Coconut oil can help reduce protein loss in some hair types.
- Honey + yogurt mask: small amount of honey (humectant) mixed with plain yogurt (protein) can add moisture and slight nourishment — use 15–20 minutes then rinse.
- Light oils for daily sealing: argan oil, jojoba, or squalane — a 1–3 drop press into ends after towel-drying to visually smooth and reduce friction.
Safety tips
- Don’t over-oil roots or use heavy butters that make hair greasy and attract dirt.
- Patch test if you have a sensitive scalp.
- DIY masks are temporary cosmetics — use judiciously and continue with professional products for structural repair.
Sealing Techniques: How to Lock Moisture into Dry Ends

Sealing keeps the benefits of masks and conditioners in place.
Sealing routine (step-by-step)
- After conditioning and a cool rinse, blot hair gently with a microfiber towel.
- Apply a water-based leave-in conditioner to damp hair (spritz or creamy leave-in).
- Press a few drops of a light oil (argan, jojoba) into the ends to lock moisture and smooth cuticle.
- If you use a heat protectant before styling, apply it over the leave-in (not under too many layers).
- Finish with a cool blast from your hairdryer (if you must dry) or let hair air-dry.
The sequence — water (hydration) → light leave-in → oil seal — preserves moisture without weighing hair down.
Heat-Free Styling Tricks That Hide Damage
You can look styled without extra heat.
Heat-free ideas
- Braids for waves: braid damp hair at night for soft waves that disguise dry ends.
- Twist and pin updos: twist sections and pin for a polished look.
- Rollers or flexi-rods on damp hair: set overnight for bounce without heat.
- Smooth with leave-in and oil: a small amount of smoothing serum on ends and a gentle brush can create a sleeker look.
- Low-manipulation styles: buns, low ponytails, and headbands reduce friction and protect ends.
These methods avoid additional heat and give you instant visual improvement.
Nighttime Care: Sleep Habits and Protection for Fragile Ends
Night care makes a measurable difference.
Night routine (step-by-step)
- Apply a small amount of leave-in conditioner or smoothing oil to ends if very dry.
- Loosely braid or wrap hair to reduce tangles and breakage.
- Sleep on a satin or silk pillowcase or use a satin bonnet/scarf to reduce friction.
- Avoid tight elastic bands that cause stress at the same point nightly.
- Refresh in the morning with a little water and a dab of serum if needed.
Consistent nighttime care reduces physical wear that worsens split ends.
Routine Maintenance: Frequency, Product Order, and Long-Term Care
Make a simple weekly plan you can stick to.
Sample 4-week maintenance routine
- Weekly: 1 deep-conditioning moisture mask (10–30 minutes).
- Every 2–4 weeks: bond-building treatment (if using at-home kits) or protein treatment if hair needs strength.
- Every wash: gentle shampoo on scalp; conditioner on lengths/ends; cool rinse; leave-in conditioner; tiny oil on ends.
- Daily: avoid heat, brush gently, sleep on satin.
- Monthly: dusting trim if you choose to keep length but remove splits.
Product order for a wash day
- Shampoo (scalp focus) → rinse.
- Deep conditioner/mask (lengths and ends) → rinse.
- Leave-in treatment on damp hair.
- Light oil/serum to seal.
- Style heat-free or with minimal heat/protectant if needed.
Consistency and simplicity beat complicated routines.
When to See a Professional — Salon Treatments That Repair Better
In-salon treatments can be more powerful and controlled.
Salon options (what to ask for)
- Professional bond-building treatments (the salon version is typically stronger and more effective than at-home kits).
- Ozone or steam-assisted deep conditioning to improve product penetration.
- Keratin smoothing treatments can temporarily smooth cuticles — but they often require heat and formaldehyde-free options should be chosen carefully.
- Protein/gloss/toner services for shine and minor reinforcement.
- Precision dusting or reshaping to remove splits without sacrificing length.
If you’re considering chemical smoothing or intense heat-based fixes, consult a trusted stylist who can assess hair integrity and recommend the safest approach (and do a strand test).
Common Mistakes That Slow Down Recovery

Avoid these traps.
- Over-using protein — too much protein leaves hair stiff and prone to breakage. Alternate with moisturizing masks.
- Going back to high heat too soon — this erases gains quickly.
- Using heavy products at the roots — they make hair look limp and increase wash frequency, which dries ends further.
- Skipping trims forever — tiny splits can travel up the shaft. Dusting keeps hair looking healthy.
- Doing DIY chemical fixes (bleaching, perms) while repairing — wait until hair is stronger.
Patience and the right balance of moisture vs. protein are the keys.
Final Words
Repairing heat-damaged ends is absolutely possible — but it takes a clear plan and steady care. Start by eliminating further damage: reduce heat, protect what’s left, and switch to gentle cleansing. Use a combination of deep moisturizing masks, carefully timed protein or bond-building treatments, and leave-in seals to restore strength and smoothness. Use heat-free styling and protective night habits to keep improvements in place. If you want faster or more dramatic results, a professional bond treatment or a small dusting trim at a trusted salon will accelerate the transformation.


